This is currently unnamed since I just began construction. I had some ideas though...
Some elements to add that I had in mind...
An Immelmann, A corkscrew, perhaps a hill and a turn or two and call it my first coaster. Does that seem good enough? Haha, I don't want to start extremely tough but I want a nice looking coaster by the end of it. Any constructive feedback is welcomed! You won't hurt my feelings this is legit my first ever custom SS coaster from scratch.
Here are some images for you guys to see where I'm headed.
Day 1: (Update #1)
 image.jpg 142.71KB
3 downloads
image.jpg 143.93KB
1 downloads
image.jpg 152.92KB
0 downloads
image.jpg 160.08KB
1 downloads
image.jpg 142.71KB
3 downloads
image.jpg 143.93KB
1 downloads
image.jpg 152.92KB
0 downloads
image.jpg 160.08KB
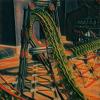
1 downloadsI'm not digging this part of the drop, it looks smooth and it certainly does the job, it is pretty sturdy too but I'm not sure if a.) It evens looks visually appealing and b.) If I'm using too many pieces than I need to? This drop is my own... Like vision haha, i had no references and I just went with gut feeling.
image.jpg 172.79KB
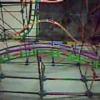
2 downloadsWhat do you guys think?! Let me know what I can improve on, if I should change anything, or even some suggestions / ideas for elements and such to add.
Thanks for checking it out!
P.S. - Dragon Ball Z all day haha
Edited by rct3fan00, 25 April 2016 - 12:49 AM.