How to build tube supports
#1
Posted 30 September 2010 - 11:08 PM
Here are a couple picks of the sizes but most of you should all ready know them by now.
White Tube
Blue Tubes
Yellow or Black Tubes
Metallic Green or Red Tubes
Gray Tubes
All Tubes
#2
Posted 01 October 2010 - 01:43 AM
SSCoasters Administrator
The SSCoasters Forum Rules
#3
Posted 01 October 2010 - 07:00 AM
#4
Posted 01 October 2010 - 08:38 AM
*edit* I guess I got distracted by the pictures and didn't read all of your first post. I'll look forward to updates.
#5
Posted 01 October 2010 - 12:22 PM
Building the base for the support column. Many people use different types of base supports to keep the tube in place here's one example Speed O Fear had a very easy base to build to hold the tubes in place. Today I am going to show you how to build Speed O Fears Base
Step one build this! Make suer that all steps are correct.
step two: Add spacers to the 4 white rods.
Step Three: Add the grey locks on top of the spacers like so
Step Four: then add blue locks to hold the tube in place.
Step Five: place white or silver rods on the bottom of the tube either side is fine
Step Six: place the tube in the center of the base.
It should look like this when completed. Comment's are welcome
#6
Posted 01 October 2010 - 02:02 PM
This makes me want to revise my wobbly support bases.
I have a feeling this is going to be my favorite tut thread.
#7
Posted 01 October 2010 - 02:20 PM
#8
Posted 01 October 2010 - 02:24 PM
.
#9
Posted 01 October 2010 - 04:33 PM
#10
Posted 01 October 2010 - 05:16 PM
But I like the idea of this thread.
Keep it up! I would just check them first, to make sure that there strong, and can hold up alot of weight.
KR11
SSCoasters Moderator
Fear the Bankatana | The SSCoasters Forum Rules
Maverick|Tatsu|TTD|Fahrenheit|Skyrush|MF|Cheetah Hunt|Storm Runner|SheiKra|Montu
Coaster Count: 102
#11
Posted 02 October 2010 - 01:55 PM
Chapter 2: Basic A frame building. The A frame is simple it just depends on how big you want it or how small. I'm still going with speed O Fears structure cause thats the only one I know how to build so far so bare with me. I am going to show you how to build the wrap around turn on speed o fear and placing the track on as well.
this is how far I got last night. I might get the chance to finish this tonight or tomorrow so inspect some updates.
Step 1: Is basically the same. build the base
step 2: Extend the tubes by placing 2 half moon connectors and 2 brown connectors
Step 3: It should look like this when it's complete.
Step 4: building the turn to hold the tubes in place be sure that they are built correctly as shown on both sides.
be sure to extend the center as well in the middle
Left side
Right side of turn
Step 5: Place another tube on the left side and place gray rods to connect the both of them.
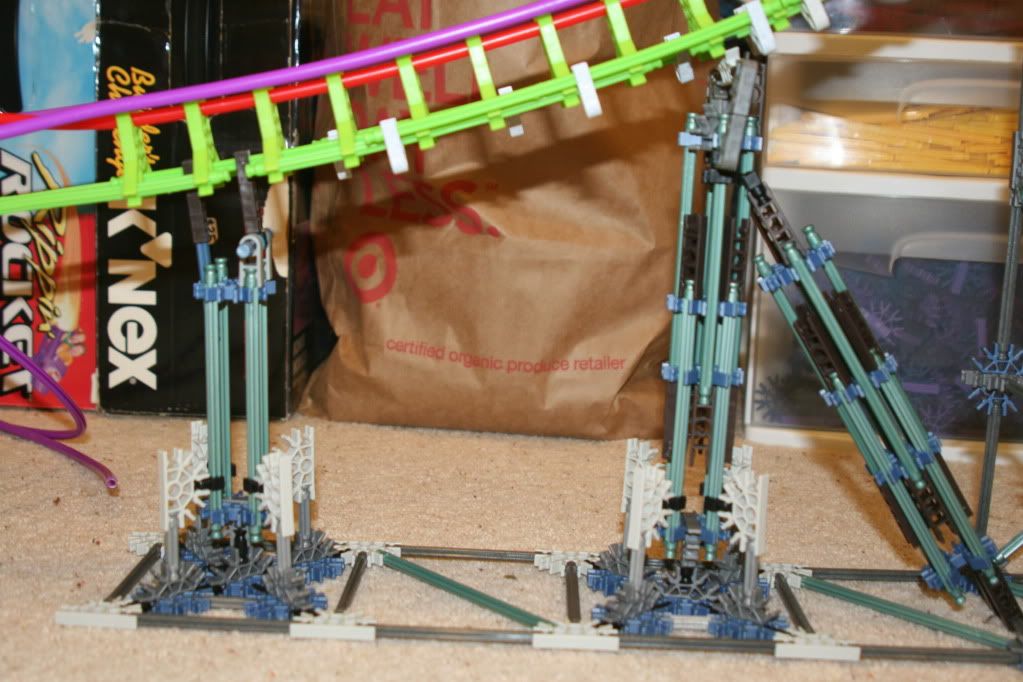
Step 6: Basically the same thing just add another tube on the right side.
Step 7: You Should have this when it's Finished.
Again I might have the A frame section done later tonight or Tomorrow Comment's are appreciated .
#12
Posted 02 October 2010 - 01:57 PM
#13
Posted 02 October 2010 - 03:13 PM
#14
Posted 02 October 2010 - 04:01 PM
When I started w/tubes, i had problems keeping the headers from moving down the tube. In other words, i needed to secure the snowflake connector at the top somehow, so the header would stay in place over time. Here is an example of a secured header on an adjustable loop tube support:
Look at the front tube. Notice the ball joint holding the track is connected to the purple/blue 3d. (I like using ball joints bcuz they are adjustable) The 3d is held in place by 4 blue rods attached to the end of brown ladders (u can only see 2 of them well). Here is the footer of same tube:
The 2 front greys are in the same location on the tube as the 2 blue rods in the above photo, and are held by the ball joints at the bottom. This way the 3d can't slide down at all.
Here's another example of a tube with a ball joint header held in place by a blue/purple 3d:
The 3d is kept from sliding down by the grey single hinge attached to the white rod.
The white rod is butted against a grey that continues all the way down to the footer. (it's actually 2 greys connected by a brown ladder, but u get the point)
This footer is more solid than the last one, but hinges for angling. Well, I hope this helps some people. If there's a better or nicer looking method, let me know.
#15
Posted 03 October 2010 - 01:15 AM
Chapter 2 continued
Step 8: Place 2 black or yellow rods with brown connecters as shown here place a blue rod in the middle of the 2 brown connecters do the same for the left and right ones too. This is in the center tube which is the highest one.
Step 9: Place these 4 pieces as shown on the top of the center tube
Step 10: Place an Orange or white 45* connecter on all blue rods as shown
Step 11: now build and extend the tube as seen here.
Note: connect the tube to the 45* connecter once it has been built.
Step 12: Adding the tracK. This step is quite simple really just place the track to the on the highest tube which has the 4 pieces on it and do the same on the 2 bottom tubes.
Once you have done that Congrats you have built a partial wrap around turn. Comments suggestions and concerns are appreciated.
#16
Posted 04 October 2010 - 02:28 AM
In this picture you can see how I connect my vertical tubes to the ground. Notice that there is a BLACK snow flake connector right underneath the tube, to support all the grey rods!
Edited by Jogumpie, 04 September 2013 - 12:23 PM.
SSCoasters Administrator
The SSCoasters Forum Rules
#17
Posted 04 October 2010 - 06:48 AM
#18
Posted 08 October 2010 - 01:33 PM
#19
Posted 21 October 2010 - 10:08 AM
I built a few tube supports to use to modify a pirate ship ride, the biggest issue I notice with the supports is that they want to bow when placed on an angle, how do you over come this?
#20
Posted 21 October 2010 - 01:09 PM