#1
Posted 02 May 2012 - 07:01 PM
I'm going to show you how to make it.
First of all, we're going to need these tools:
A screwdriver, a binder clip, a pair of pliers, and a lighter.
Place the binder clip on the car's chain dog like this:
Then unscrew these 4 screws.
Remove the car's plastic body.
Now comes the tricky part: We're going to melt some stubbies.
Hold the square end with the pliers and light the flat, round end.
It only takes about 3 seconds for the piece to start melting.
The stubby will catch fire, this is normal.
Put the flaming stubby into the hole until the square end touches the top of the hole.
It's important that you don't blow it out until it's in the hole because it gets hard as soon as you blow it.
That's what she said.
Congratz, the hard part is over.
Now we're going to make the seats.
For that, you'll need these pieces. This will make one row of seats.
Put the connectors on a red rod in this order:
... like this:
For the front car, you will need to put a gray rod behind the seats like this:
For the back car, put the gray rod in front of the seats like this:
Now attatch the two rows on the car like this:
Position the front car so the two middle seats hold the chain dog in place.
It's now safe to take the binder clip off the chain dog.
And there you have it.
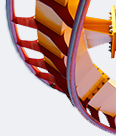
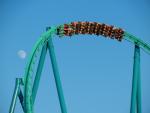
One custom B&M Floorless car.
#2
Posted 02 May 2012 - 07:05 PM
What exactly does the chain-dog rest against, what stops it from popping out?
SSCoasters Administrator
Read The Forum Rules(smart)
#3
Posted 02 May 2012 - 07:06 PM
#4
Posted 02 May 2012 - 07:07 PM
The signature you have requested is not available at the moment. We apologize for the inconvenience.
#5
Posted 02 May 2012 - 07:12 PM
That's quite a hardcore mod, melting pieces and such. Wouldn't it be easier to use hot-glue? Not to mention that it would allow you to get your cars back to their original state.
What exactly does the chain-dog rest against, what stops it from popping out?
The piece that I melted is a very loose fit in the hole. If I were to use glue, it would be too tall to hold the chain dog in place.
The chain dog is held by an open cavity in the car's chassis and is normally held in place by protrusions in the underside of the plastic body.
The bottoms of the middle seats work in the same way as those protrusions, sitting on top of that hole to keep the chain dog from popping out.
Those cars look very realistic and it looks like a breeze to assemble them. How difficult is it to revert them to normal VV cars?
Haven't tried yet. I suppose it all comes down to whether or not you could get the melted stubby out the hole.
#6
Posted 03 May 2012 - 12:29 AM
edit: i just made one, ITS AWESOME!!!!!!, now i need to test it on something
edit2: and there would be no way for glue to work, i tried glue and it sat to high. atleast i will be able to attach many different designs to this car .i dont care about "ruining" cars sice i have 11 of them and soon to be more
#7
Posted 08 May 2012 - 09:58 AM
When the train enters a tight corner, the seats tend to collide or tangle with one another.
This is how I fixed it.
I turned the cars upside-down and spaced them out until the space between the trains matched the space between the seats.
I used some string and tied knots on the ends, lining them up with the holes under the train.
Then I threaded 2 white spacers and 1 blue spacer onto the string.
To keep the string from falling out of the train, I put tape over the holes.
And then to keep the trains an equal distance apart, I wrapped tape around the three spacers.
#8
Posted 07 May 2019 - 02:38 PM
(I hope it is okay to reply on a 7 year old post, been a while since I was last here, 2013, oh boy)
I gave this mod a go with the hot glue method since I had already found a way to secure the chain-dog. And I must say, it works suprisingly well. I made some slight adjustments to your car design so that it sits a bit higher, since due to not melting pieces the brackets sit much higher.
To secure the chain dog I just used a drop of hotglue on the straight part of the spring that sits on the plastic.
Check these images to see what my modifications look like, and an additional B&M wing car for the fans:
#9
Posted 27 May 2019 - 07:07 PM
Those trains look great! I would open your own thread instead of bumping old ones.
Also tagged with one or more of these keywords: dragon, sea, sea dragon
K'NEX Discussion & Construction Area →
SSC Contests →
Official SSC Contest Area →
Top Model #3 2012 Entry ThreadStarted by Jogumpie , 18 Sep 2012 dragon, sea, sea dragon |
|
|
||
|
K'NEX Discussion & Construction Area →
K'NEX Coaster Construction →
cancelledStarted by Dragon , 08 Dec 2011 coaster, dragon, drop, lift, mega |
|
|
|
K'NEX Discussion & Construction Area →
K'NEX Coaster Construction →
Sea Dragon(recre) CANCELEDStarted by Turtle Man 24 , 27 Nov 2011 dragon, sea, sea dragon |
|
|
||
|
→
SSC Awards Archive →
SSC Awards 2011 →
Nominations: Best AutomationStarted by pkiknex25 , 03 Nov 2011 dragon, sea, sea dragon |
|
|
|
K'NEX Discussion & Construction Area →
K'NEX Coaster Construction →
(F&F presents) Crackerjack(Final Video)Started by dylan , 30 Dec 2009 dragon, fire, looper |
|
|