Jump to content


Basic Building for Dummies!


  • Please log in to reply
88 replies to this topic

#1 DJMK

DJMK

    Lead Engineer

  • 1604 posts

Posted 01 January 2008 - 08:13 PM

Volume one:
Chapter 1- Turns
Okay, no one on this site, not even the newest noob should not know extremely basic building, (Like how to use a 3D connector).

So for all the other noobs/dummies on the site who are having trouble with turns , here is help for the structures of the turns.

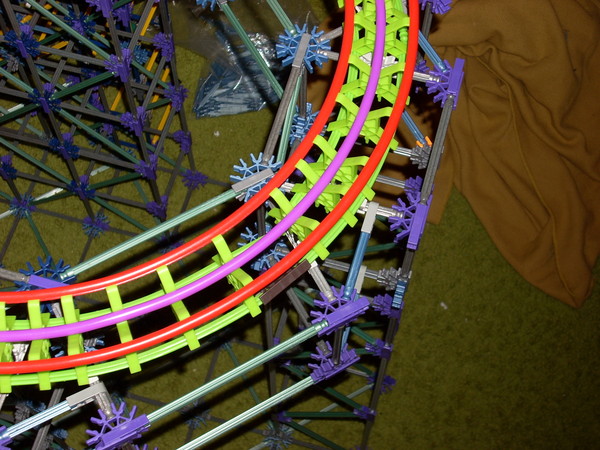
Here is what the SS instruction booklet teaches you to use, and it does work great:
Posted Image

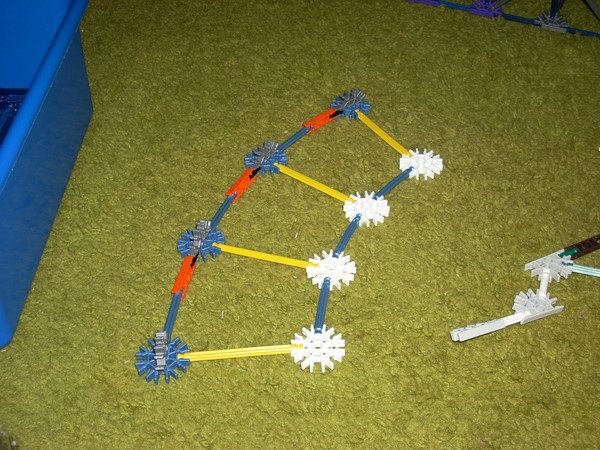
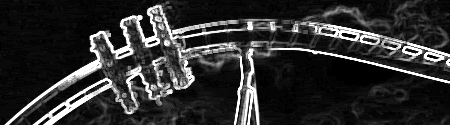
Another kind of turn is mostly used on wooden style coasters. To prevent pieces from breaking, use a white connector, or full 3D connector on the inner curve. Here is the base of it:
Posted Image


------------------

Chapter 2-How to save pieces
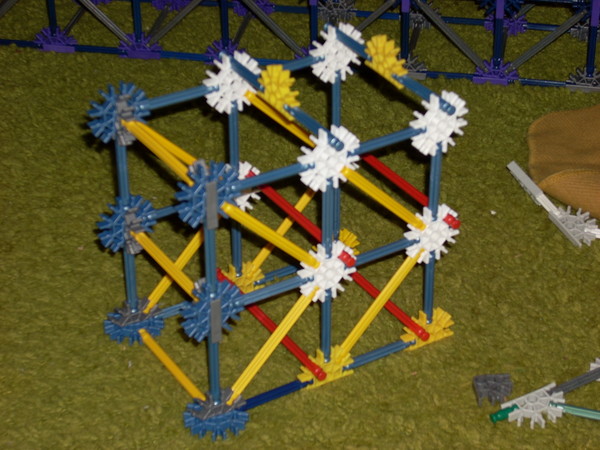
Both of these are good ideas on how to save pieces on wooden coasters, and others as well.

Here is the most common method for saving pieces. By using this method, you will save 3D connectors, and what rod you are using as the width. This is built by snapping the next rod size up into a yellow half moon connector or white full connector.
Posted Image

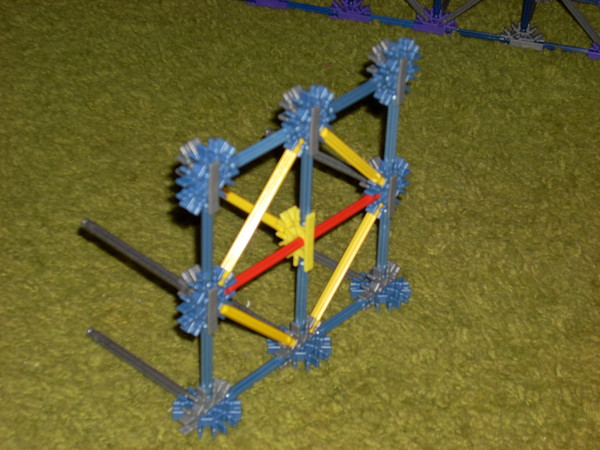
The next method is not used as much, but saves 1 3D connector and two blue rods each time you use it. You slid a rod rod through a yellow half moon connector and connect it just like a 3D connector.
Posted Image

Next is how to make strong supports!

Posted Image
Posted Image


#2 KingsIslandFreak

KingsIslandFreak

    Lead Engineer

  • 1135 posts

Posted 01 January 2008 - 08:21 PM

Awesome!!! this would teach noobs alot!

[SIGPIC][/SIGPIC]
^^Thanks Immelmann!^^

KIF RIDE DESIGN

#3 Antinos

Antinos

    Is it smooth and long?

  • 8086 posts

Posted 01 January 2008 - 08:53 PM

I was thinking of doing something like this! I'll probably add to this sooner or later, so expect some help.

Posted Image
Goliath(SFGAm)|Bizarro(SFNE)|BDash|Toro|Maverick|Voyage|Banshee|WickedCyclone|Skyrush|Leviathan
Coaster Count: 312

Character - What you do when nobody is watching.
Facebook | Youtube | Twitter


#4 mophead999

mophead999

    Maker of small coasters

  • 369 posts

Posted 01 January 2008 - 08:55 PM

maybe you should add a side view of the first turn to see how the suuports are built better.

[SIGPIC][/SIGPIC]
Gracias CC10!:banit
Coasters:
Serpents Screw(complete)
Biohazard(complete)
Airstrike(under construction)
Journey to the sun(design)

#5 poizone

poizone

    Small Spaces

  • 995 posts

Posted 01 January 2008 - 09:07 PM

You should not the names also.

2. is Radii

4. is Hybrid

Currently compiling a massive list


#6 DJMK

DJMK

    Lead Engineer

  • 1604 posts

Posted 01 January 2008 - 09:09 PM

Okay, anyone who has something to contribute may do so, as long as you can write in english nd not lik dis!.

^Ill see if there's another angle that I can get of the turn that will help people.

Posted Image
Posted Image


#7 Antinos

Antinos

    Is it smooth and long?

  • 8086 posts

Posted 01 January 2008 - 09:09 PM

^I used the exact same supports as number 4 on Fission and it wasn't a hybrid. It was just a way to conserve pieces.

Posted Image
Goliath(SFGAm)|Bizarro(SFNE)|BDash|Toro|Maverick|Voyage|Banshee|WickedCyclone|Skyrush|Leviathan
Coaster Count: 312

Character - What you do when nobody is watching.
Facebook | Youtube | Twitter


#8 poizone

poizone

    Small Spaces

  • 995 posts

Posted 01 January 2008 - 09:20 PM

But we seem to identify those supports as hybrid for the most part. Its not a defined coaster type by use, but if we can tell what supports they plan to use, it may as well be named.

Currently compiling a massive list


#9 Antinos

Antinos

    Is it smooth and long?

  • 8086 posts

Posted 01 January 2008 - 09:54 PM

Chapter 2: The perfect lift.

Lifts should be one of the least supported parts of the ride. Unless you have another element attached to it, a lifthill doesn't need half the pieces.

Your lift should be shaped like a right triangle, with one tower at the tallest point supporting it and another diagonal tower at a 45 degree angle. The towers should be full of lattice. Snake-eyes is a perfect example of what it should look like:

http://sscoasters.ne...album=391&pos=1

You can clearly see the shape of the lifthill. Depending on the size of your lift, you may have different types and sizes of supports. Here are just some of many examples:

http://sscoasters.ne...album=305&pos=5

http://sscoasters.ne...?album=28&pos=1

http://sscoasters.ne...lbum=221&pos=12

Also, depending on the size of the lift and type of supports you use, you may have to add extra supports so it doesn't sag. Anarchy shows an excellent way of doing this without using too many pieces:

http://www.sscoaster...Anarchy_007.jpg

Center tubing is always recommended and securing the ends so the chain has a clean transition onto it is a good idea. Watch the placement of your gears. If you look at all those photos, you can see that the axle is just above the flexi rods. An easy way to start with the gears on the bottom is to build the SS base of the lifthill and then build your own custom version from there. Always check your profile(sideview) of the lift. Make sure it looks realistic. If it looks too tight for the height, fix it, and vice versa. The rest should be common sense. Any questions?

Posted Image
Goliath(SFGAm)|Bizarro(SFNE)|BDash|Toro|Maverick|Voyage|Banshee|WickedCyclone|Skyrush|Leviathan
Coaster Count: 312

Character - What you do when nobody is watching.
Facebook | Youtube | Twitter


#10 rippinrocketlover08

rippinrocketlover08

    Newbie

  • Pip
  • 4 posts

Posted 02 January 2008 - 01:20 PM

Hello i'm new here but when i try to load the chain lift pictures they dont work can anyone help please


#11 nickostick

nickostick

    Mr. Freeze

  • 1048 posts

Posted 02 January 2008 - 03:53 PM

Great job DMJK and Rollerdude.^_^ I will be sure to send people here.

Posted Image

^Thancks to st33l

My Coasters
Nemesis (Completed)
Potestas (Under Construction)
Science project (Completed)


#12 DJMK

DJMK

    Lead Engineer

  • 1604 posts

Posted 02 January 2008 - 04:55 PM

^^Okay...
Upload to the new gallery? Or photobucket or something else?

Posted Image
Posted Image


#13 Coasteradict

Coasteradict

    The hate sign

  • 1883 posts

Posted 02 January 2008 - 05:03 PM

someone should sticky this lol this is good

[SIGPIC][/SIGPIC]
Thanks Immelmann

#14 Jogumpie

Jogumpie

    Living through the great Gump hiatus...

  • 13586 posts

Posted 02 January 2008 - 10:32 PM

I think there should be a set of web pages containing really useful tips and tricks about 'Basic Building for Dummies'. Although I stickied the thread, I wonder if people will re-read this in the far away future.


SSCoasters Administrator
The SSCoasters Forum Rules
DD_signature.jpg
YoutubeButton.pngFacebookButton.png


#15 rippinrocketlover08

rippinrocketlover08

    Newbie

  • Pip
  • 4 posts

Posted 03 January 2008 - 05:38 AM

Are the pictured in the gallery DJMK??


#16 untd4eva

untd4eva

    BANNED

  • 196 posts

Posted 03 January 2008 - 12:24 PM

Ive got a tip for a smooth transision from the chain onto the centre tube.If you put the centre tube in boiling water for half a minute then bend it downwards.Hold it there for about a minute and then it stays like that permanently untill you boil it again and bend it back straight. It really helps stop the chain jerk each time a chain link goes on/off the tube.


#17 Britfag

Britfag

    Everybody's Russian!

  • 3818 posts

Posted 03 January 2008 - 12:36 PM

hey does anyone know (seems as its to do with corners)
does anyone know how to do a twister woodie turning drop??
THE ONE AFTER THE CHAIN LIFT (or atleast large straight up hill.)
ive tried atleast 4 times
anyone are to help? :)


#18 untd4eva

untd4eva

    BANNED

  • 196 posts

Posted 03 January 2008 - 01:21 PM

Use the knex men joint parts to attatch the track at different angles. Use the
Radi supports and build it like steps to keep close with the level of the track.Ill show pics in a minute.


#19 lazor 22

lazor 22

    Enter The Rage

  • 5967 posts

Posted 03 January 2008 - 03:06 PM

ok i ve got one. its for slim-track.

CAPTER 3: the basics of slim-trak.

the other type of track used with knex roller coasters is commonly referd to (on this site) as 1.slim-trak 2.micro track

Basic Supporting:
DO NOT build structres out of micro knex. Use the micro-standerd connecter to make normal supports.

Turns/ Helixs:
Basicly since all turns must be overbanked (90 deggre) you should just conect the track to the side of your support. DO NOT make a sharp turn. turns get down drasticly on you speed.

Inversions (all):
After you have experimented with drops and turns your ready for your fist inversion!
to keep up your speed you must support these just right. lets say you have a 3 foot lift/drop, a loop, immelmen, or dual cobra roll should be about 1 foot high. a in-line-twist, heartline roll, or barrel roll should (at minimum) be 2 track pieces long, (at most) 4 track pieces long.


Chainlifts:
OK, so youve now got your coaster built. Now all you need to do is install the "electronics". to build a chain lift you must build a support for the motor. then attach the motor. then at the bottom of your lift hill you must use another gear to make the chain run smooth. you must then attach little black chain gurards to your track. Then attach all chain links and you have a chainlift.

Launches:
The alternative to a chainlift is a launch. for info on how to attach these look here:
http://www.sscoaster...gade-t6195.html
it is a dead theard though so please DO NOT post.


pictures will be up tonight.

LAZOR22SIG2.png
I305, El Toro, Goliath (SFoG), Time Machine, Talon, Apollo, Griffon, Georgia Scorcher, Nitro, Manta
Coaster Count: 77


#20 Britfag

Britfag

    Everybody's Russian!

  • 3818 posts

Posted 17 January 2008 - 12:30 PM

Use the knex men joint parts to attatch the track at different angles. Use the
Radi supports and build it like steps to keep close with the level of the track.Ill show pics in a minute.


i figured it out before i read this, but thanks for replying :)
i did a reaally complicated way which might be up in a few weeks, (tops)
with a tutorial :)