Hi, just want to give a couple of my thoughts. First off I love the concept and I really am excited about this thread because I love these new trains, and we have another solid coaster to follow.
As far as the layout, from a realism perspective I feel like the g forces in that airtime Hill would be extreme to the point where our thighs would be hurting. But then I guess you're using shoulder restraints on these. I also agree with SCM... The first drops twist is really tight.
Keep it up though, I love the fact that you're using tubes and I'm excited to see where this goes! Also, that's an interesting base structure you have would it be possible to get a close up picture of the base so I can see your design?
37 replies to this topic
#22

Alabastine
-
-

- 37 posts
Advanced Member
Posted 10 November 2021 - 01:25 PM
Hi all, thanks for the feedback.
I know it's been a while but I finally did some work on the train lately. I think I am quite happy with the overall design now, maybe I'll change some small things and then proceed to make a full prototype train. I'll probably need some more purple pieces though  . After that I want to try some things with the bearings before I continue track work.
There were a lot of things to improve but I also wanted to reduce moment of inertia around the x-axis. So I made the chairs halfway from the 3D print and lightened the restraints. I don't have a scale actually but it feels lighter than before, I printed with thin walls and little infill.
Here are some pictures of the finished car. Goal is to print a train in blue PETG as well and see how that works out.


peace out
#23
KnexThrillsMaker
-
-
- 6 posts
Newbie
Posted 10 November 2021 - 08:48 PM
That is one nice set up, excellent work on it!
#24
Alabastine
-
-
- 37 posts
Advanced Member
Posted 18 November 2021 - 03:43 PM
Thanks!
Zero car ready to be printed. That means all I need now is prepare more bearings and order more micro K'nex, sadly they're out of stock  .
.

#25
Alabastine
-
-
- 37 posts
Advanced Member
Posted 04 December 2021 - 05:55 AM
I've made a first functioning zero car for this train (no chain hook yet). I'll finish a third car this weekend and the fourth (and last) probably soon.


Edited by Alabastine, 04 December 2021 - 05:55 AM.
#26
CrayCray for coasters
-

- 292 posts
Construction Foreman
Posted 10 December 2021 - 10:01 AM
I've made a first functioning zero car for this train (no chain hook yet). I'll finish a third car this weekend and the fourth (and last) probably soon.
that looks incredible, i love the way that the bearings look like weighting holes for real wheels
- Alabastine likes this
hello there. I'm CrayCray for Coasters and i truly am
#27
RCT2123
-

-

- 5771 posts
Most Rides Cancelled :-)
Posted 19 December 2021 - 09:52 PM
Looks great! What's the number for those top bearings?
![]()
#28
Alabastine
-
-
- 37 posts
Advanced Member
Posted 21 December 2021 - 07:08 AM
Looks great! What's the number for those top bearings?
Thanks! Both of you.
They're 634-2RS, 4x16x5 (IDxODxW).
I am trying to get as little friction as I can from the bearings as we speak actually, but it's taking quite a lot of time. Then the train would be finished as I already have 4 cars printed and assembled with K'nex.
#29
Alabastine
-
-
- 37 posts
Advanced Member
Posted 21 December 2021 - 07:39 AM
For if anyone else wants to try this, I was inspired by this genuine piece of history to treat the bearings with graphite.
https://www.youtube....hannel=Magluvin
I know this has been done on stock SS wheels, but I don't know if any of you tried it with bearing trains. It takes a bit of labour to properly run them in and clean them (before and after), but on the bearings I have done so far the freewheeling results look very good, I haven't tried this on an actual train yet and I can only hope it holds up well over time.
#30
Steelwheels33
-
- 112 posts
Construction Foreman
Posted 22 December 2021 - 02:15 PM
That is awesome Albastine! I love the difference in spin times in the video with the graphite added. For some context, I used to lube the SS train stock wheel axles with graphite powder and I got good results, the only issue with that is there is so little surface area for the graphite to cling to. But in a ball bearing, you have all that surface area to work with.
I agree with advice Johnny gave me a while ago about his original bearing design and the ones he uses, and how he prefers to run them dry. I find they work good running dry as well, but I will give the graphite lube a shot to see what happens!
To anyone who has not tried using graphite, just beware as it is messy if not done carefully, and that graphite can stain your SS trains, your pieces, and your track. So as Albastine says above, spend the time cleaning excess after applying it.
#31
Alabastine
-
-
- 37 posts
Advanced Member
Posted 24 December 2021 - 08:06 AM
That is awesome Albastine! I love the difference in spin times in the video with the graphite added. For some context, I used to lube the SS train stock wheel axles with graphite powder and I got good results, the only issue with that is there is so little surface area for the graphite to cling to. But in a ball bearing, you have all that surface area to work with.
I agree with advice Johnny gave me a while ago about his original bearing design and the ones he uses, and how he prefers to run them dry. I find they work good running dry as well, but I will give the graphite lube a shot to see what happens!
To anyone who has not tried using graphite, just beware as it is messy if not done carefully, and that graphite can stain your SS trains, your pieces, and your track. So as Albastine says above, spend the time cleaning excess after applying it.
Thanks and yes I second that, it is very messy and gets everywhere if you're not careful so keep that in mind. I handle them mostly inside a shoe box. It's also advisable to wear rubber gloves.
I also put my bearings in a jar with graphite powder for some time until I have time to run them in and clean them, but they seem to have rusted quite well in that week or so. So I think it will be better to not leave them in graphite for a long time.
#32
Alabastine
-
-
- 37 posts
Advanced Member
Posted 19 March 2023 - 11:11 AM
After a very long hiatus I did some work on the train and coaster and thought to share the current state, here is a video of some tests (coaster is not finished). It includes slow motion, sorry about the music.
On the graphite powder, it kinda works but it is a lot of work. And in my experience some bearings come out of it worse. Some will spin godlike though, but they don't always stay that smooth for long.
#33
Alabastine
-
-
- 37 posts
Advanced Member
Posted 20 March 2023 - 09:48 AM
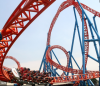
I got the fourth car on the coaster and one more element complete. It runs well, maybe a bit more speed loss than I would have ideally liked but it works well so far.


#34
RCT2123
-
-
- 5771 posts
Most Rides Cancelled :-)
Posted 20 March 2023 - 03:02 PM
So cool. These custom trains run so differently than the old SS ones. I could see someone developing a more generic base for building custom trains on top of. It's hard to overstate how much 3D printers have changed this hobby. It's a real shame we didn't have them back in the glory days. Looking forward to more!
- Alabastine likes this
![]()
#35
Alabastine
-
-
- 37 posts
Advanced Member
Posted 22 March 2023 - 08:21 AM
So cool. These custom trains run so differently than the old SS ones. I could see someone developing a more generic base for building custom trains on top of. It's hard to overstate how much 3D printers have changed this hobby. It's a real shame we didn't have them back in the glory days. Looking forward to more!
Let's bring in some new glory days then!  .
.
#36
Alabastine
-
-
- 37 posts
Advanced Member
Posted 22 March 2023 - 08:45 AM
So cool. These custom trains run so differently than the old SS ones. I could see someone developing a more generic base for building custom trains on top of. It's hard to overstate how much 3D printers have changed this hobby. It's a real shame we didn't have them back in the glory days. Looking forward to more!
Btw, although you can't make a full custom train with this print, there is room to customise, this is an example on an broken older prototype print. I made a part of the chair in the print to save weight, but the plan was originally to have (mostly) full K'nex chairs. I am not sure if I still need that weight save though but I'll continue with the design as is I think.
I might have found some decent passengers for them as well.


Edited by Alabastine, 22 March 2023 - 09:04 AM.
#37
Alabastine
-
-
- 37 posts
Advanced Member
Posted 22 March 2023 - 04:41 PM
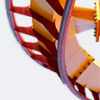
I finished a complete red car, here are some pictures. The light isn't the best sorry.


#38
Alabastine
-
-
- 37 posts
Advanced Member
Posted 31 May 2023 - 09:22 AM
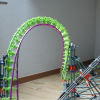
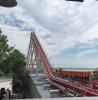
I thought to make a picture while building, hoping to get a temporary full circuit for my birthday on saturday
Attached Files
-
 IMG_20230531_161814298.jpg 166.74KB
0 downloads
IMG_20230531_161814298.jpg 166.74KB
0 downloads