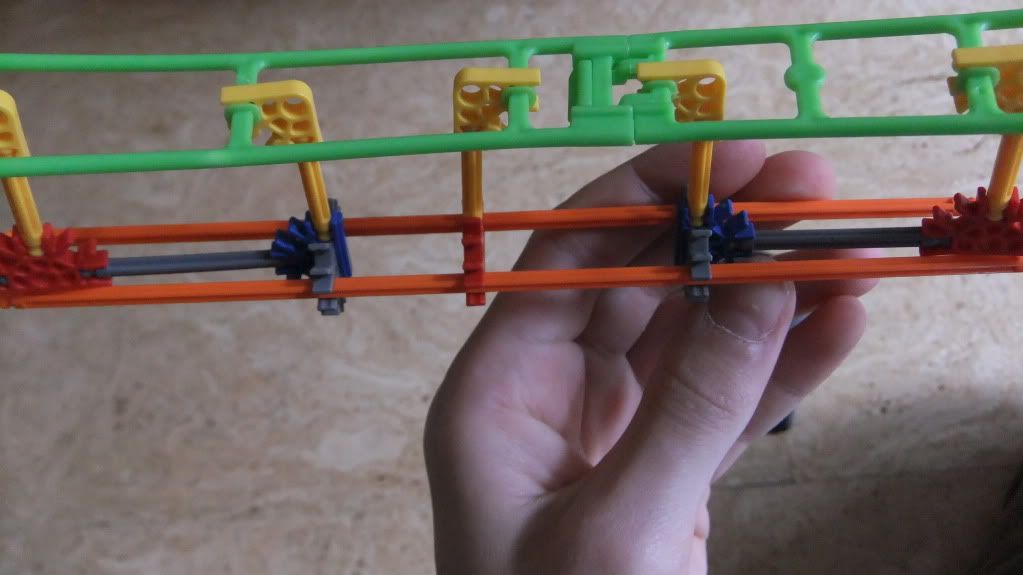
Jump to content


VV Building For Dummies

dummies tut tutorial vv building

  • Please log in to reply
29 replies to this topic

#1 RCExtreme

RCExtreme

    Entry Engineer

  • 851 posts

Posted 04 March 2011 - 07:07 PM

Chapter 1: Track Spines.

VV track spines are mainly used when building tube-supported coasters, but they're also very useful for box-supported coasters too. There are 4 main types of track spines, which you can see in the pictures below.

Micro spines
Posted Image

1st spine
Posted Image

Posted Image

Credit to BBaller347

2nd spine
Posted Image

Posted Image
Credit to RCExtreme(me)

3rd spine
Posted Image

Posted Image
Credit to Tornado96

4th spine
Posted Image

Posted Image
Credit to Intamin Thrill Rides

The 4th track spine only works with supports made out of original sized pieces. Please note that you can also use flexi-rods in place of the gray rods.


#2 The Stig

The Stig

    Some say...

  • 4609 posts

Posted 04 March 2011 - 11:27 PM

Here's the spine I used for Assassin and most of Euphoria. It's good if you don't have many half-moons or elbows.

Posted Image


#3 chaindogg33

chaindogg33

    Constructioneer

  • 312 posts

Posted 16 March 2011 - 12:00 AM

Sorry for bringing this back up after many days of no posts but, just curious stig, are you using the little tiny tan clips to hold those purple ladders to the track, or are they liitle black ones? I have never seen them in black before.

-CD33

Posted Image

#4 tornado96

tornado96

    VV Australia

  • 922 posts

Posted 16 March 2011 - 03:46 AM

Sorry for bringing this back up after many days of no posts but, just curious stig, are you using the little tiny tan clips to hold those purple ladders to the track, or are they liitle black ones? I have never seen them in black before.


Those are from Vertical Vengeance. I don't own the set myself but half of it's pieces ONLY come in that set...


#5 chaindogg33

chaindogg33

    Constructioneer

  • 312 posts

Posted 16 March 2011 - 01:05 PM

ok, so does VV also contain those blue micro rods shown in the 3rd spine setup? They dont use them in the loopin lightnin or the speed demon coasters.

-CD33

Posted Image

#6 tornado96

tornado96

    VV Australia

  • 922 posts

Posted 17 March 2011 - 05:25 AM

ok, so does VV also contain those blue micro rods shown in the 3rd spine setup? They dont use them in the loopin lightnin or the speed demon coasters.


Basically, If you don't find it in any other set, then it's from VV.
Really annoying if you ask me.


#7 The Stig

The Stig

    Some say...

  • 4609 posts

Posted 18 March 2011 - 06:25 PM

Sorry for bringing this back up after many days of no posts but, just curious stig, are you using the little tiny tan clips to hold those purple ladders to the track, or are they liitle black ones? I have never seen them in black before.


VV gave me a bunch of tan ones. But now I have mostly black ones.
I think with Euphoria I used all black stubbies on the track.


#8 The Stig

The Stig

    Some say...

  • 4609 posts

Posted 25 April 2011 - 10:44 PM

*DP*

TRACK TO TUBE CONNECTIONS

Track to tube connections are the base for building any tube-supported coaster. This is the method that I use:

Posted Image

Posted Image

Posted Image

The "hinge" makes the connection adjustable. This is important for getting the right angle for your track when it connects to the support. The top can also rotate to allow the connection to work with a variety of different positions. You can also rotate the base of the connection by moving the green one-way connectors on different rods of the tube. This comes in handy when you want to eliminate roll or pitch. The "hinge" will only swivel perpendicular to the position of the yellow rod.

CONNECTING TUBES

Connecting tubes are important for making more complex tube structures. Although there is a great number of ways to do this, let's take a look at the basics:

There are two ways to set it up:

Posted Image

Posted Image

Keep in mind that no matter which option you choose, one of your tubes will always be free to rotate. The trick is to have the tube that doesn't rotate to act as your main support for your track.

Posted Image

^ Here you can see that I've chosen the lateral, blue tube to be able to rotate. Why? Because even if the tube rotates, it wouldn't affect structural stability. And it still provides excellent strength.

However, there is a way to eliminate tube-rotation altogether. You can do this by using cross-braces.

Posted Image

In this picture, I've attached two tubes to one by using a 3-D half-moon connector in place of a regular half-moon. Again, this structure was created by starting with the same tube connections.

Posted Image

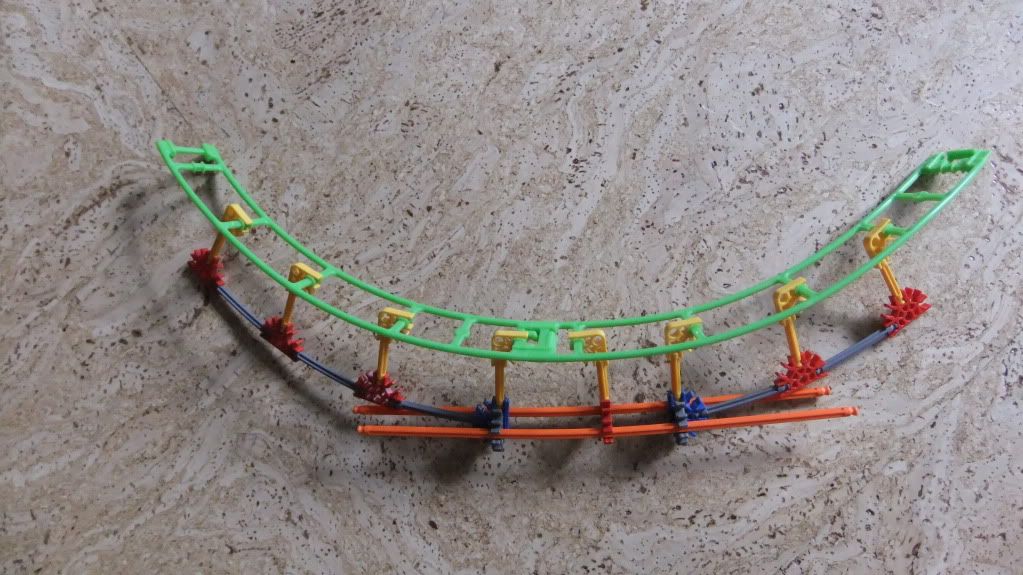
This picture shows the track connections and tube connections working together in one tube-structure.

FOOTERS

Footers are just as important (maybe even more) than track and supports. Your footers are what keeps your tubes firmly on the ground and keeps them from shaking. Without them, the entire structure of the coaster would be too weak no matter how strong your tubes were.

Although footers, like tubes, vary in size or shape depending on the situation, here is the basic footer that I use:

Posted Image

At the base is a circle of small black rods, this keeps the other rods from slipping. No, this isn't absolutely necessary for every tube, but it is essential for large tubes. I will usually use these for tubes that are 3 orange rods or longer, or at the bottom of a pull-out.

For vertical tubes, it's important to connect them to an upper-base. If this were a real coaster, it would be where the tube meets the ground. Everything under it is considered below ground-level. Here is the method that I use to connect vertical tubes at ground-level:

Posted Image

This is what keeps your tubes upright when trying to place track. It also adds strength to your support structures.

So, what if your tubes meet the ground at an angle?
It's a common problem that will happen a lot.
The footers for tubes are always the same. However, just like with tube-connections, the support will always "hinge" in one direction. The trick here is to connect the footer to a rod so it stays flat on the ground. Sometimes this will require you to change your base, or move your green one-ways to other rods of your tube.

Posted Image

In any tube structure, I will generally have at least one vertical support.

STRUCTURE

Your coaster is a machine. It runs on gravity, and produces energy.
The key to making an effective structure is to distribute that energy into the ground. For every action, there is a complete and opposite reaction.

Posted Image

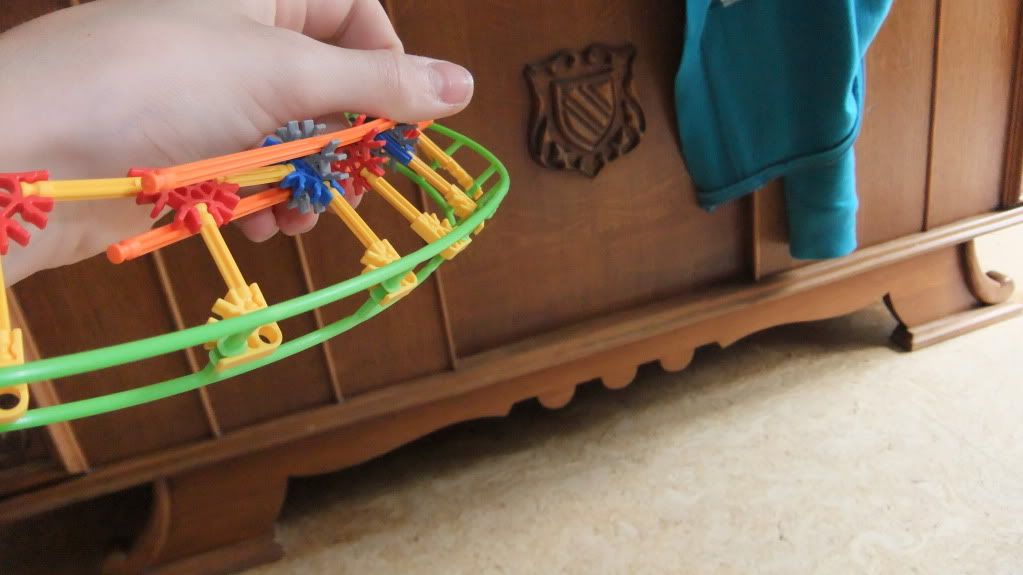
This is a picture of a structure for a large helix. Notice that two red rods have been replaced by four yellow rods with a ladder connector. This set-up enables the tube to intersect the base. And if you're reading this soon after I've posted it, surprise! The blue arrows represent the direction the energy will be traveling, and how it is dispersed into the structure.

The train puts energy into your track, which is absorbed by your supports, and distributed into your base.

CONCLUSION

So we've covered the basic techniques and disciplines of making a tube-supported VV coaster. Please remember that this guideline isn't a complete manual for coaster building. A great coaster can only come from great ideas and effort. This guide was created as a 'basic strategy tutorial' that I have developed from experience. Credit goes out to Bballer247 for his amazing track spine. And to Gump & MP thrill rides for their tutorial and perfection of tube supports.


#9 tornado96

tornado96

    VV Australia

  • 922 posts

Posted 26 April 2011 - 01:43 AM

Awesome Edition stig! I usually prefer connecting my tubes with stronger connections but I might try these out to see if theres a big difference. Also a nice track to tube support! I will definitely be using it a lot!


#10 RCExtreme

RCExtreme

    Entry Engineer

  • 851 posts

Posted 26 April 2011 - 06:31 PM

I have some more stuff to add.

Track Spines

Strengthened version of Stig's track spine.
Posted Image

And some track spines with original K'nex pieces.

Yellow
Posted Image

Red
Posted Image

Orange
Posted Image

They're all basically the same, but you can use different types or colors of pieces to get any color combination that you want.

Support track connections

Here are some great support to track connections that I use for turns.

90* banking
Posted Image

135* banking (for overbanked turns)

Posted Image

180* banking (this is very useful on inverted coasters)
Posted Image

These are some of the strongest support to track connections that you can make. They can also be used on coasters that are made completely out of micro pieces.

Footers

Here's one of the footers that Bballer347 used on his coasters, and I use it a lot.
Posted Image

You can also strengthen it like this.
Posted Image

That's all for now.


#11 Kevkillerke

Kevkillerke

    Mr. circus

  • 1658 posts

Posted 11 May 2011 - 02:42 PM

Want to add something to!

It's for the curved track, first I tried BBaller style, but my rods where bending to hard.

so i did this:

Posted Image

Posted Image

and for the inverted:
Posted Image

NOTE!
i changed the orange rods into blue's, it's much cleaner!

Posted Image
Click > Spirit Bomb/Blue Fire!/Double O/Kirnu < Click
SSC award 2014: Best SlimTrack Coaster
Eruption
Posted Image


#12 Maxwell58

Maxwell58

    French Horn is life.

  • 1765 posts

Posted 15 June 2011 - 02:11 PM

I sort of copied Stig's spine. I would only use this on high- stress areas of your coaster. (sorry about the blurry picture).

For straight sections
~picture deleted because of embarrassing nooby-ness~

90 degree
~picture deleted because of embarrassing nooby-ness~

I haven't figured out how to curve the spine. If you do please tell me how.

​I didn't choose the band life, the band life chose me.


#13 Justin

Justin

    I am Back!

  • 195 posts

Posted 15 June 2011 - 02:14 PM

Um^ Can't see the pictures.

Posted Image Thanks Kevyn230


Official Builders of Faith Member


#14 Micronex

Micronex

    Another piece for my collection

  • 1270 posts

Posted 15 June 2011 - 02:19 PM

Posted Image
Posted Image

Try replacing the red rods on the spine with green (VV) or purple (Micro) rods.


#15 Guest_321_*

Guest_321_*

Posted 15 June 2011 - 02:26 PM

Bend the sticks


#16 Maxwell58

Maxwell58

    French Horn is life.

  • 1765 posts

Posted 17 June 2011 - 09:49 PM

Bend the sticks


NEVER BEND MICRO RODS!!!!!!!! This makes them even more brittle than they already are, plus the fact that they are made to break so people buy more of them doesn't help. Once bent micro rods are extremely hard to get straight again. :D

​I didn't choose the band life, the band life chose me.


#17 Guest_321_*

Guest_321_*

Posted 30 June 2011 - 08:23 PM

I'm confused how do you make the track curve without bending the peices. Because no matter which backbone I use it never works.


#18 The Stig

The Stig

    Some say...

  • 4609 posts

Posted 30 June 2011 - 11:47 PM

^^ Micro rods are supposed to be bent. That's why they're flexible. Just don't bend them in half or step on them. That's when they get ruined.

^ Those are curved sections of track. They are available in the Looping Lightning sets.


#19 Maxwell58

Maxwell58

    French Horn is life.

  • 1765 posts

Posted 01 July 2011 - 06:59 AM

^^ Micro rods are supposed to be bent. That's why they're flexible. Just don't bend them in half or step on them. That's when they get ruined.


O, because whenever I bend them they almost always break when I try to unbend them.

​I didn't choose the band life, the band life chose me.


#20 The Stig

The Stig

    Some say...

  • 4609 posts

Posted 01 July 2011 - 06:11 PM

Ok maybe bending isn't a good word.
Don't bend your rods, flex them.

Maxwell, you were right the first time.
321, don't break your sticks.


Also tagged with one or more of these keywords: dummies, tut, tutorial, vv building