Jump to content


HellFire B&M Hyper Coaster Construction Progress

b&m hyper construction

  • Please log in to reply
17 replies to this topic

#1 KKid99

KKid99

    Ejector Airtime Lover

  • PipPipPip
  • 38 posts

Posted 04 November 2015 - 08:15 PM

Hey you guys,


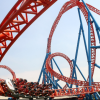
After getting situated for the start of my Senior year of high school, I decided to get started on my next project. Since I visited SFGAdv and enjoyed the B&M Hyper there, Nitro, I have decided to make my next project a B&M Hyper as well. I was also inspired by Fury 325, because, ya know, who isn't inspired by that beast?!? :P So this coaster is going to kinda have a hybrid type feel to it, attempting to blend styles and take the best elements from both for a better and more unique layout.


Now onto the pictures!  :P


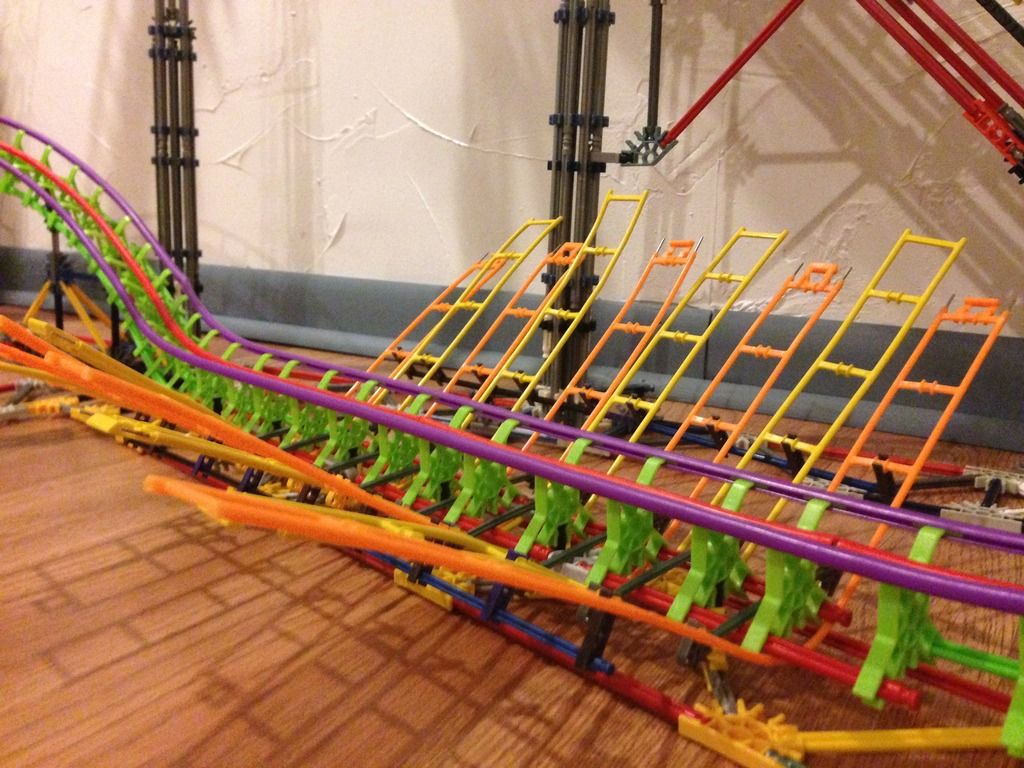
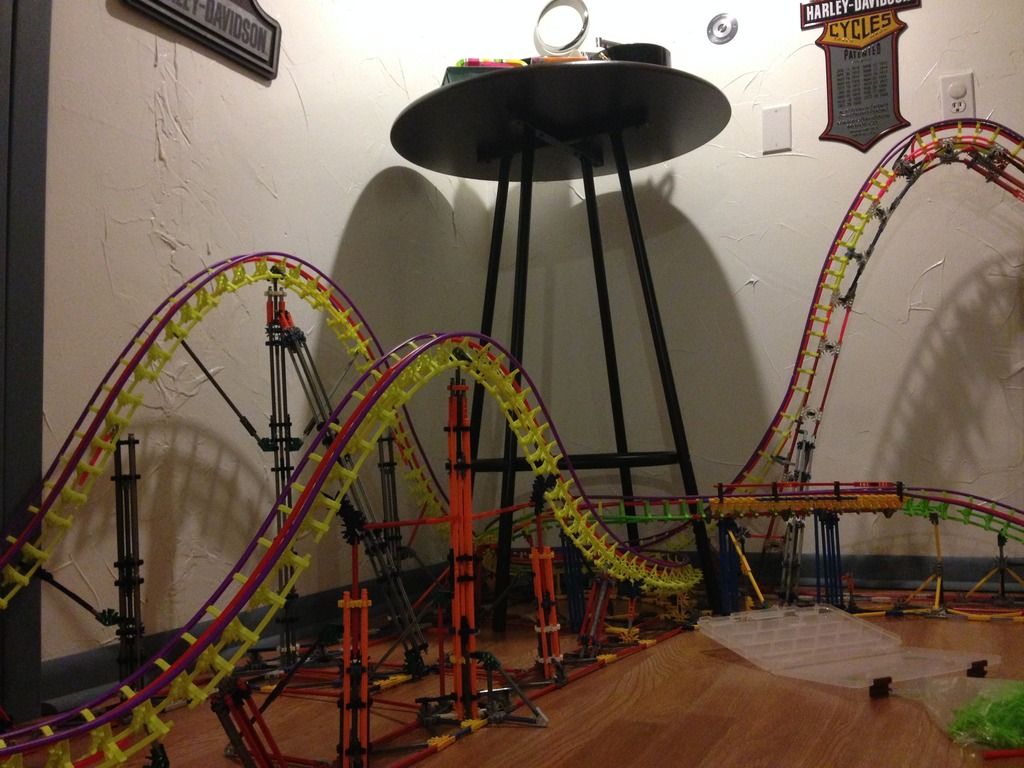
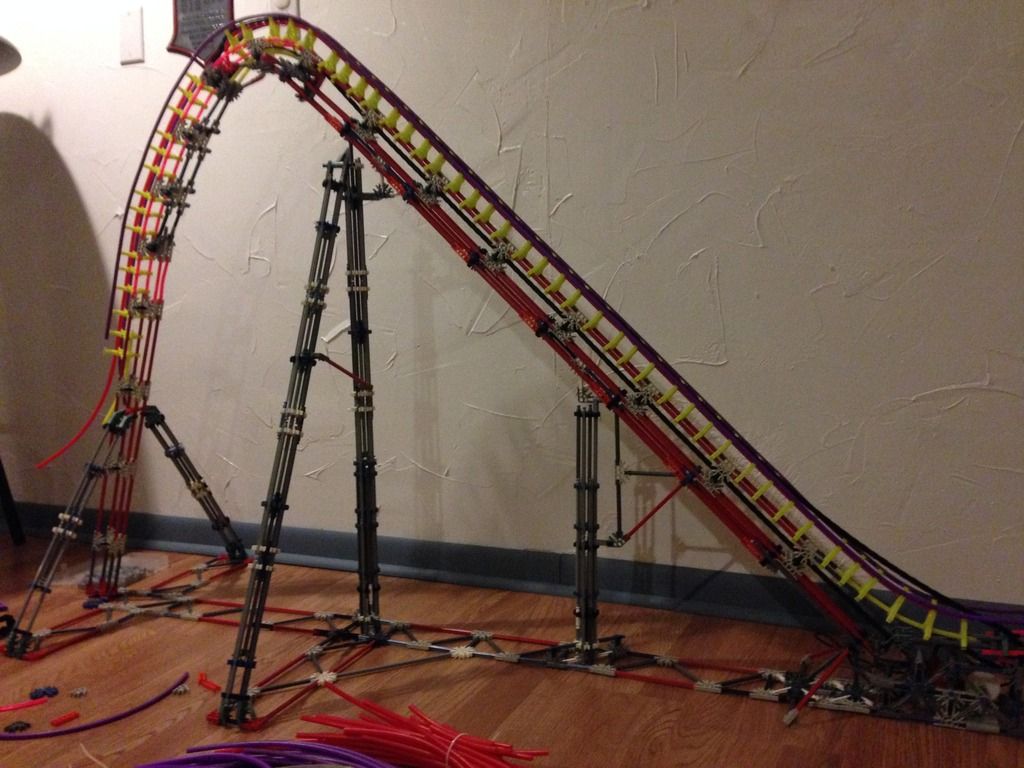
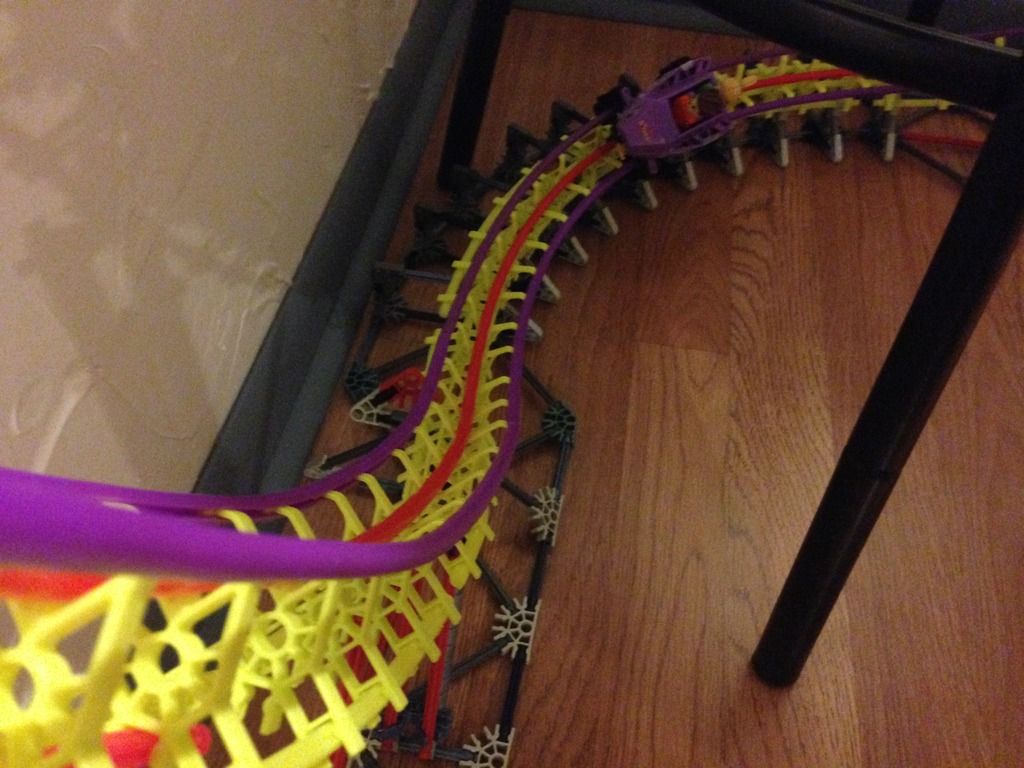
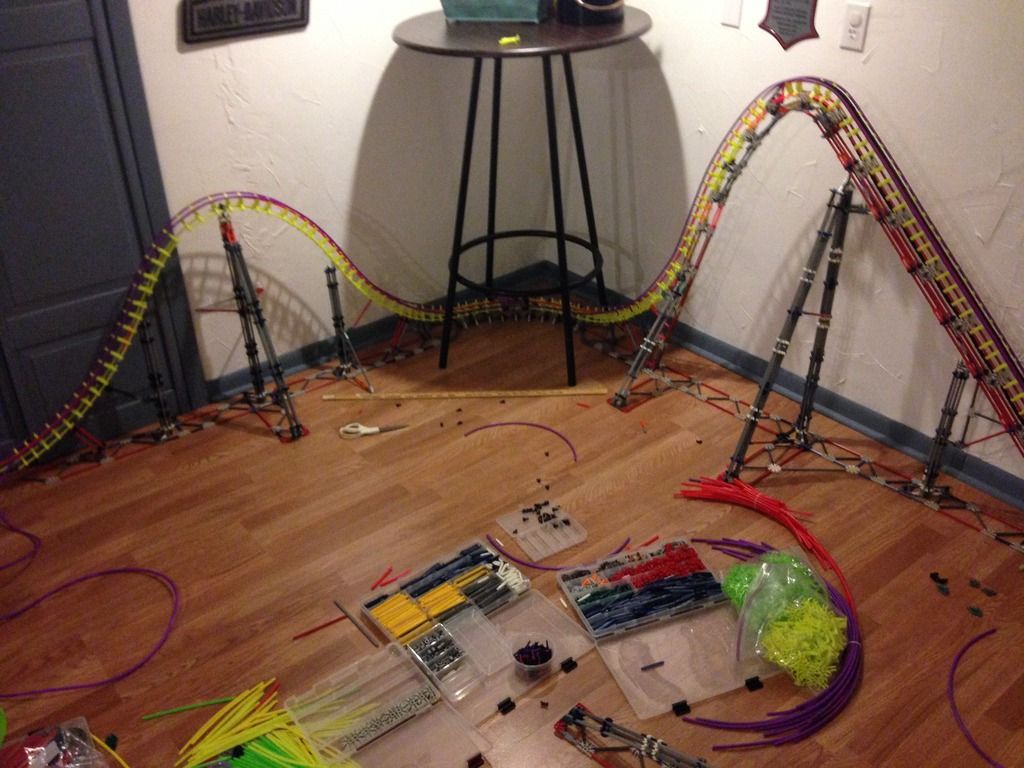
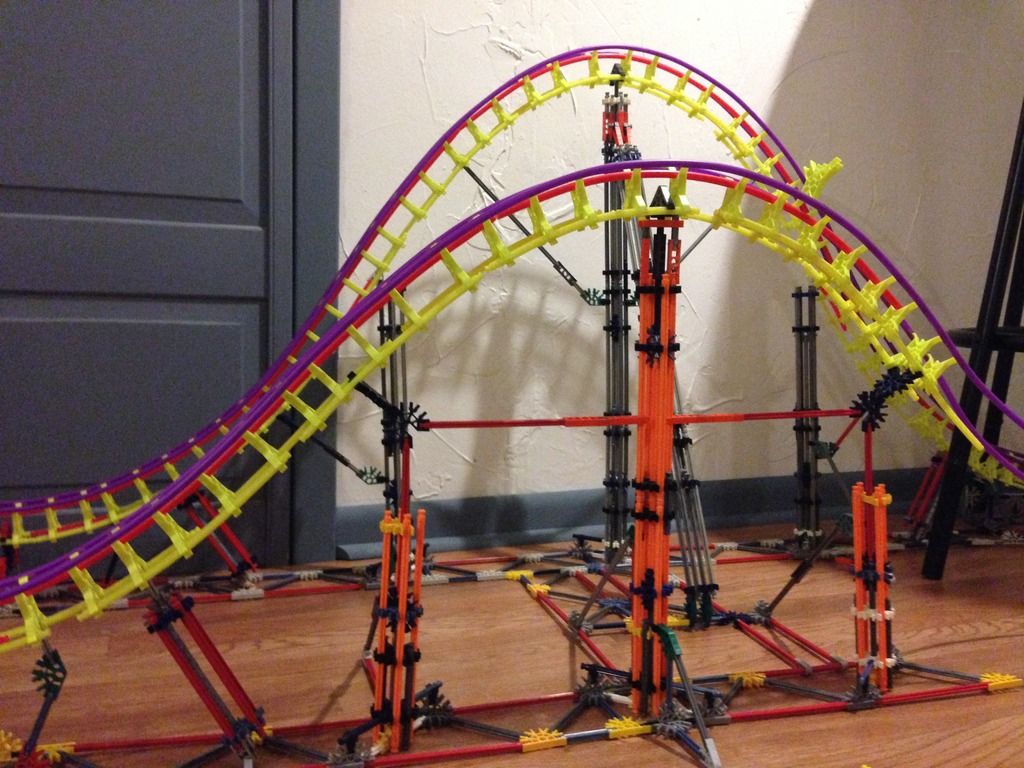
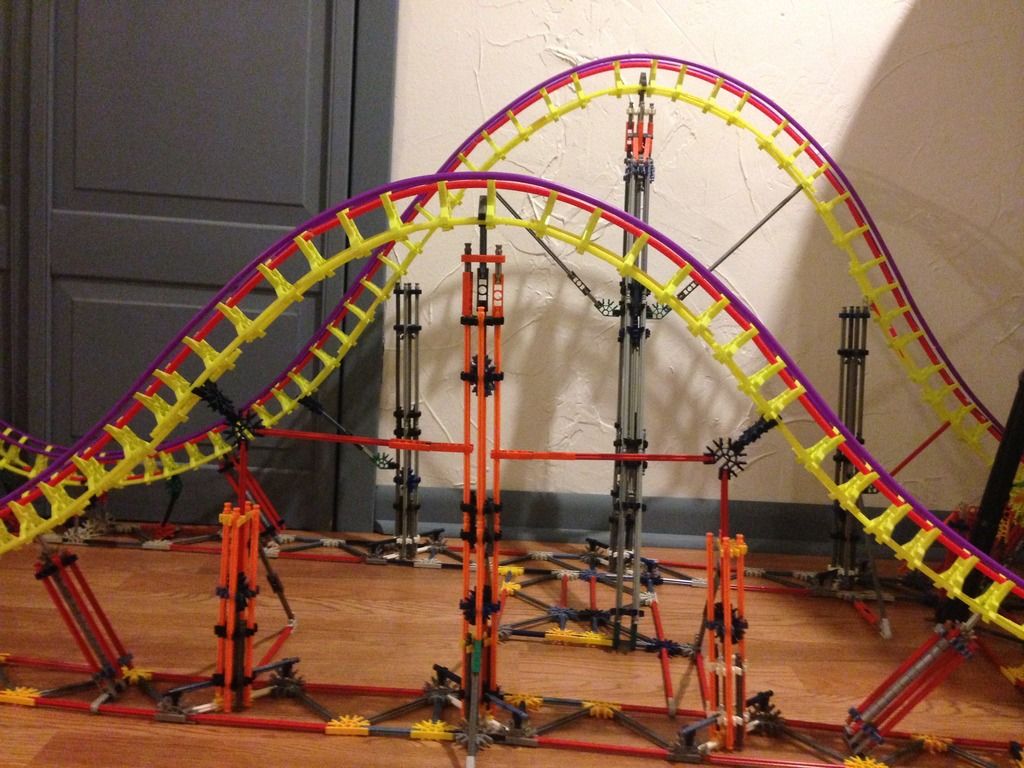
Lets first start at the base of the lift hill, where it all begins, at the chainlift. The chain motor is of similar configuration as my last project, Goliath. I tried to make it more compact and more defined in shape, as all B&M Hypers have this big rectangular box below the base of their lift hills that house the chain motor.


IMG_0354_zpsszrszxy8.jpg


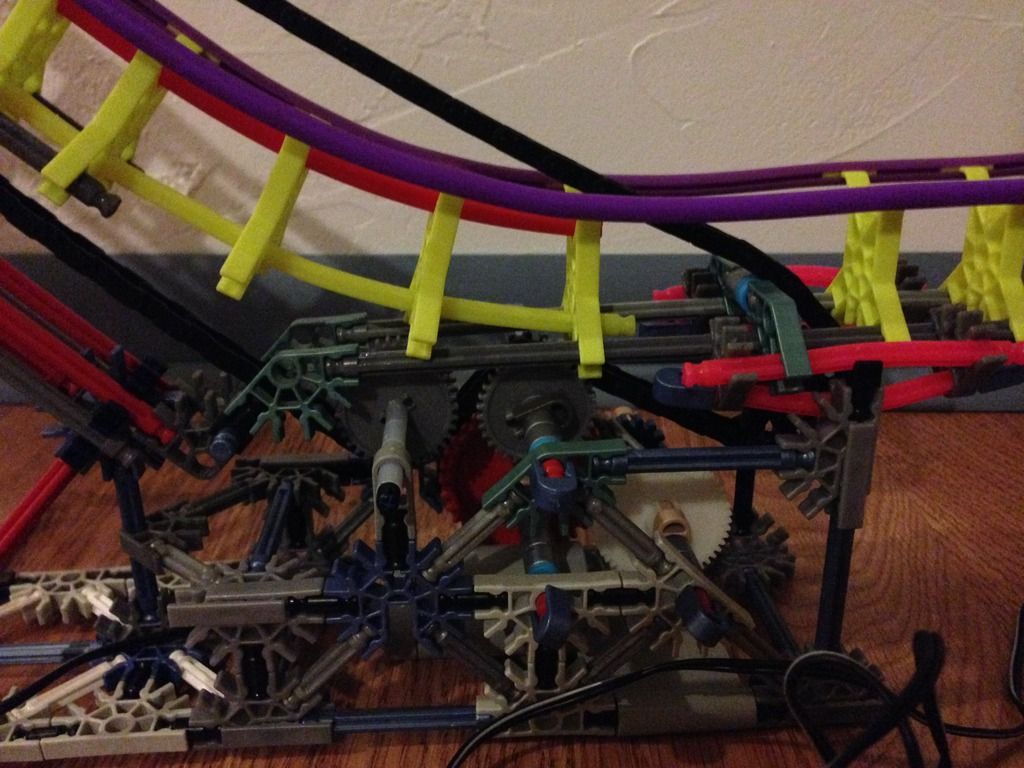
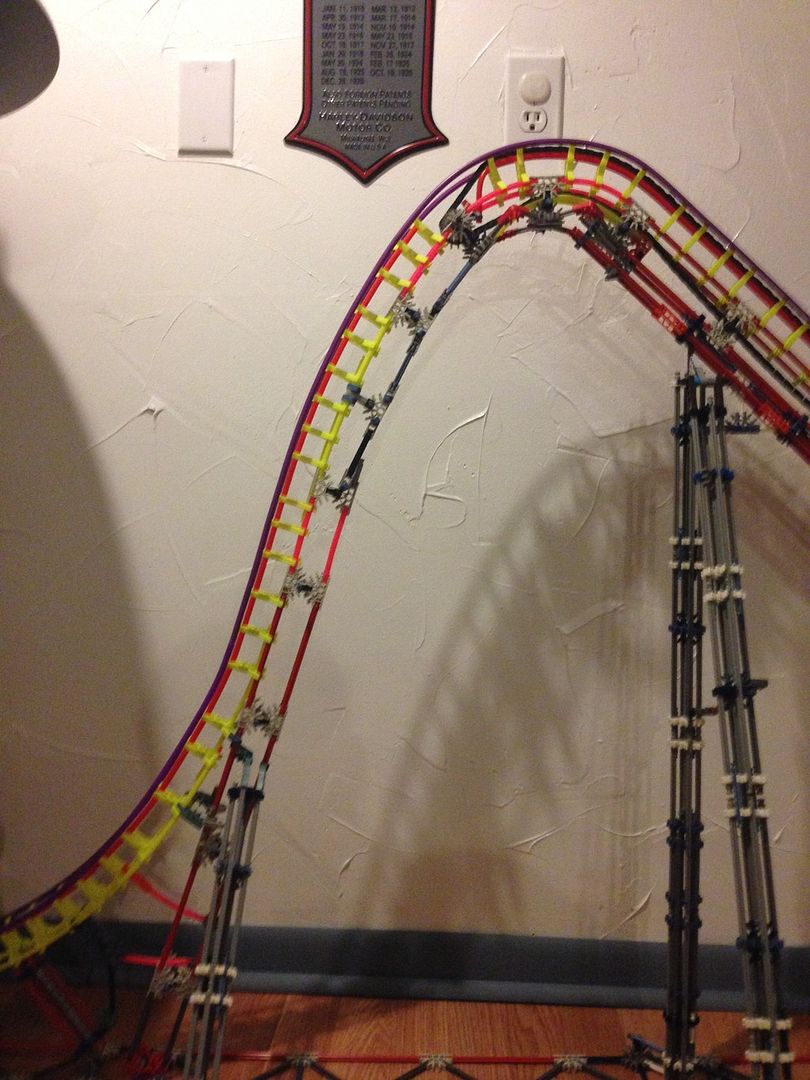
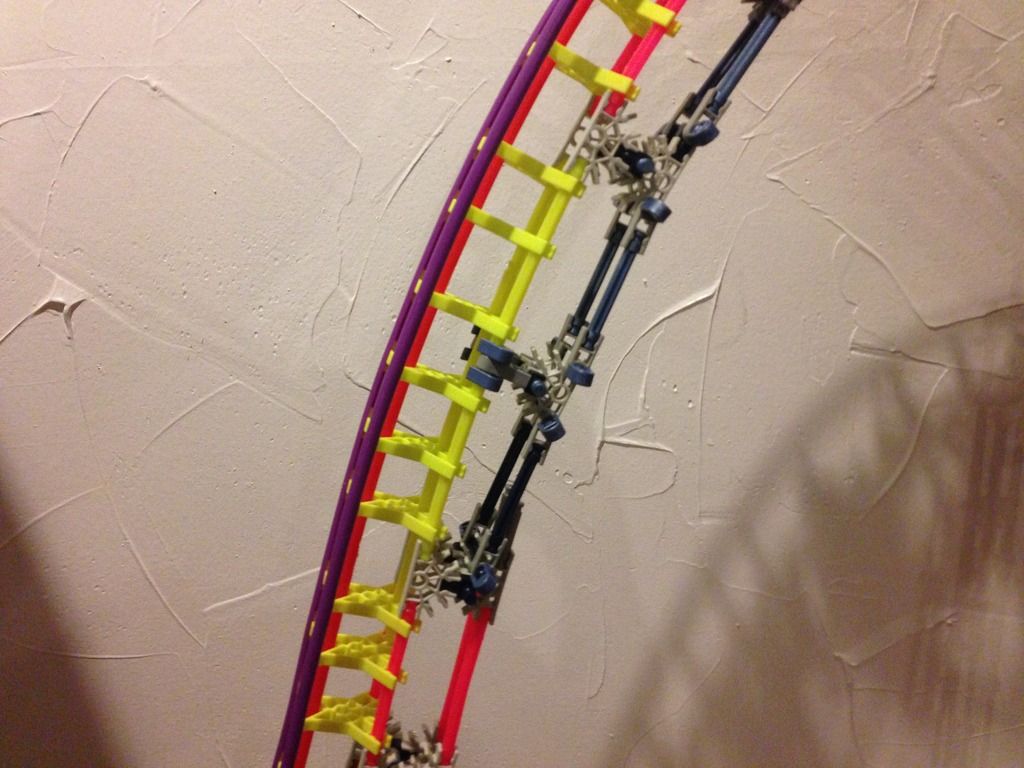
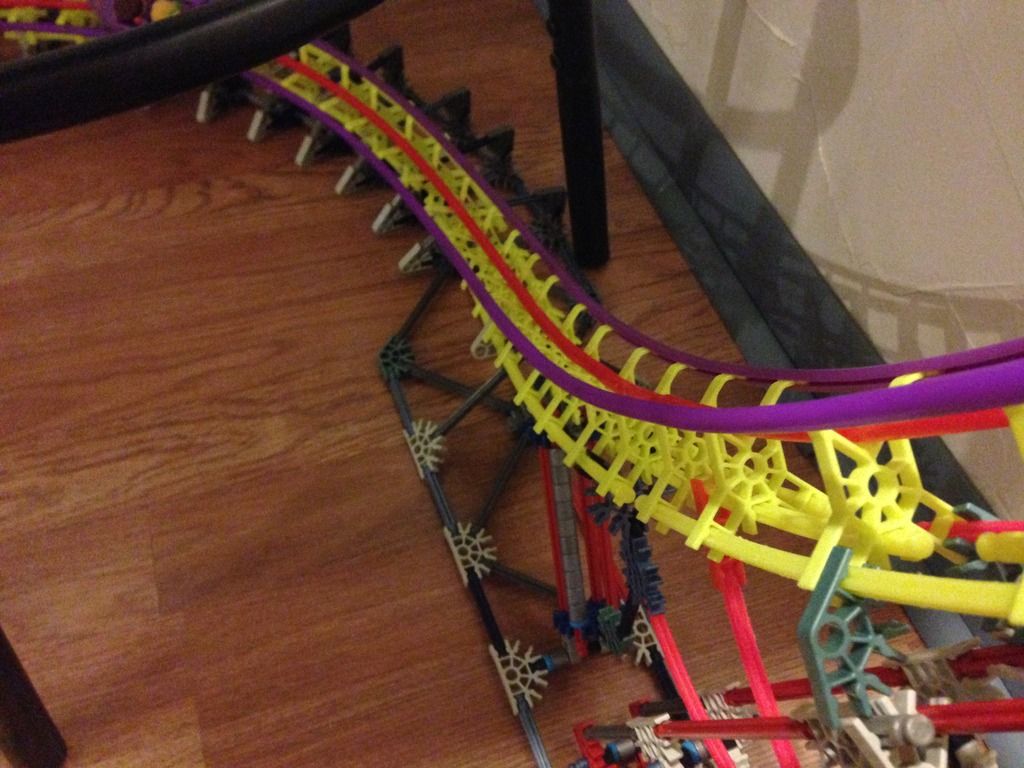
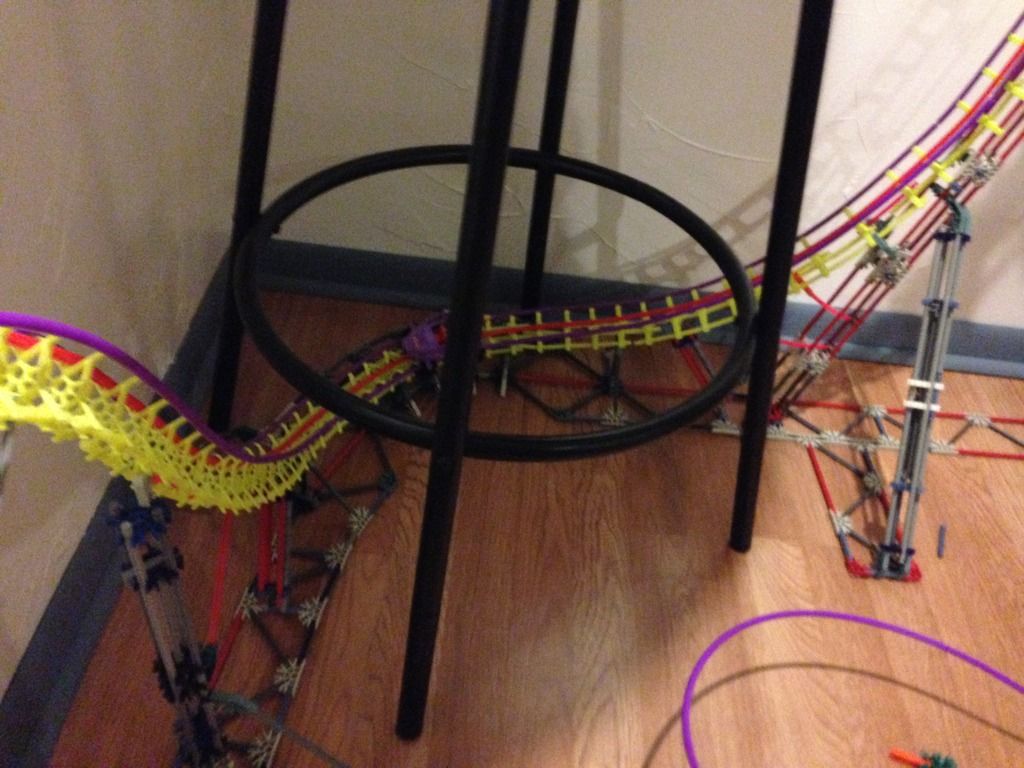
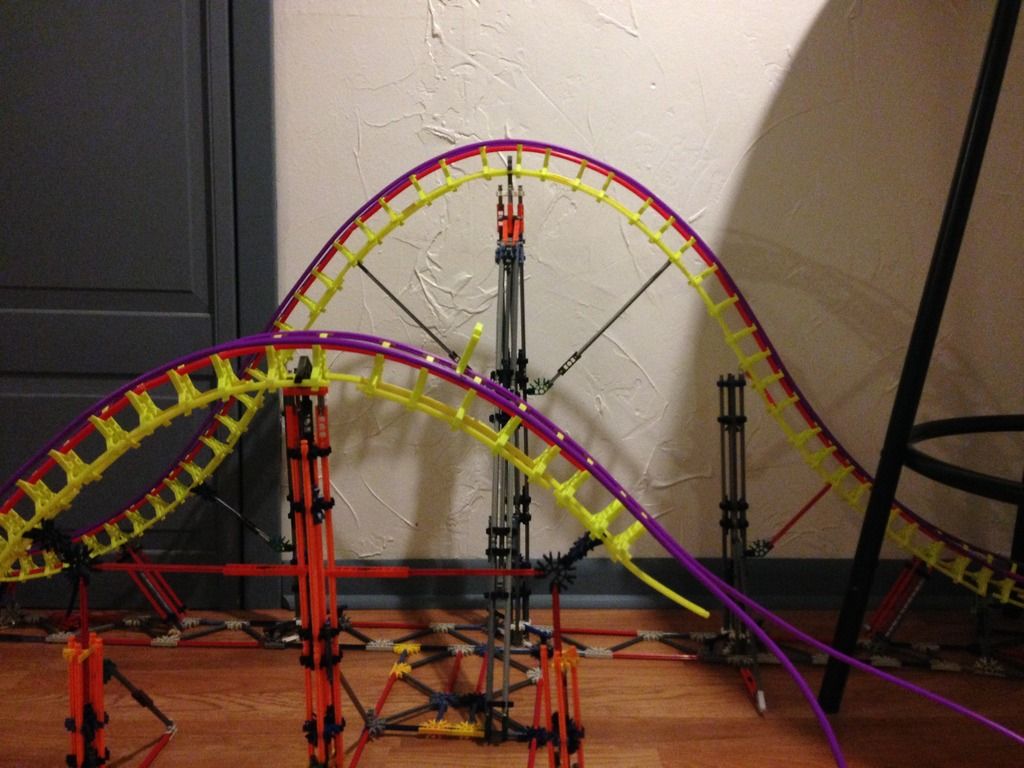
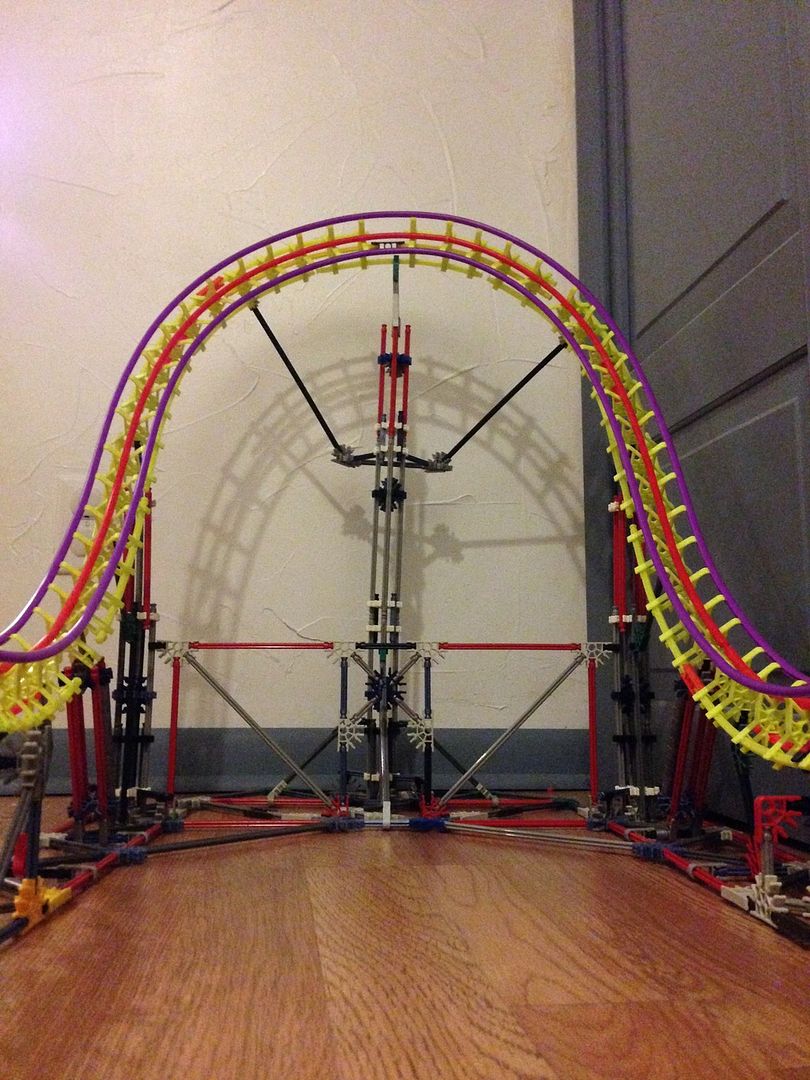
Going up from there, we have the lift hill and beyond. The lift hill supports have that familiar B&M box spine. This adds structural integrity and a perfect slot for the chain to go so that it can travel from the top of the lift hill back down to the base. 


IMG_0359_zpsyznxu2lj.jpg


Here's another view of the lift hill structure:


IMG_0355_zpsxgopnz9l.jpg


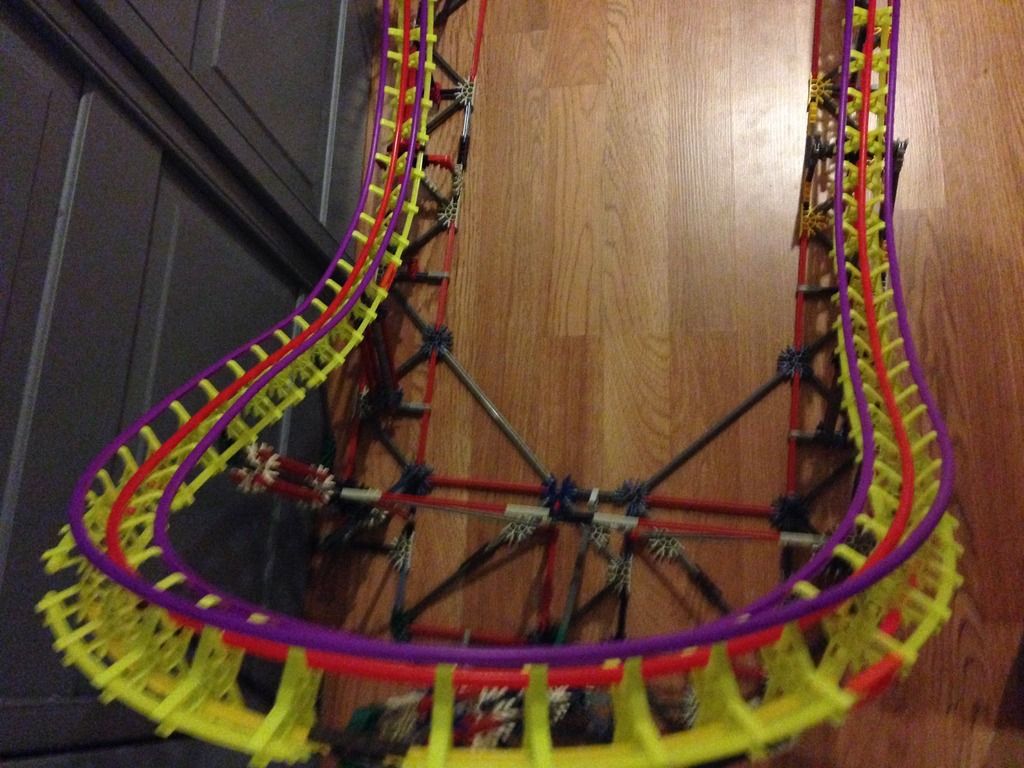
As always the most fundamental thing about B&M Hyper coasters is the simplicity of their supporting system. This is taken care of by a simple tubular support configuration. The lift hill underbelly support, as seen in this photo continues all the way to the bottom of the first drop. This support configuration is very minimalistic, and I will add more supports if I have enough pieces at the end of construction. But for now, I will stick with this. It supports everything just fine, so I guess it serves its purpose!  B)


IMG_0357_zpsu7bsrhyi.jpg


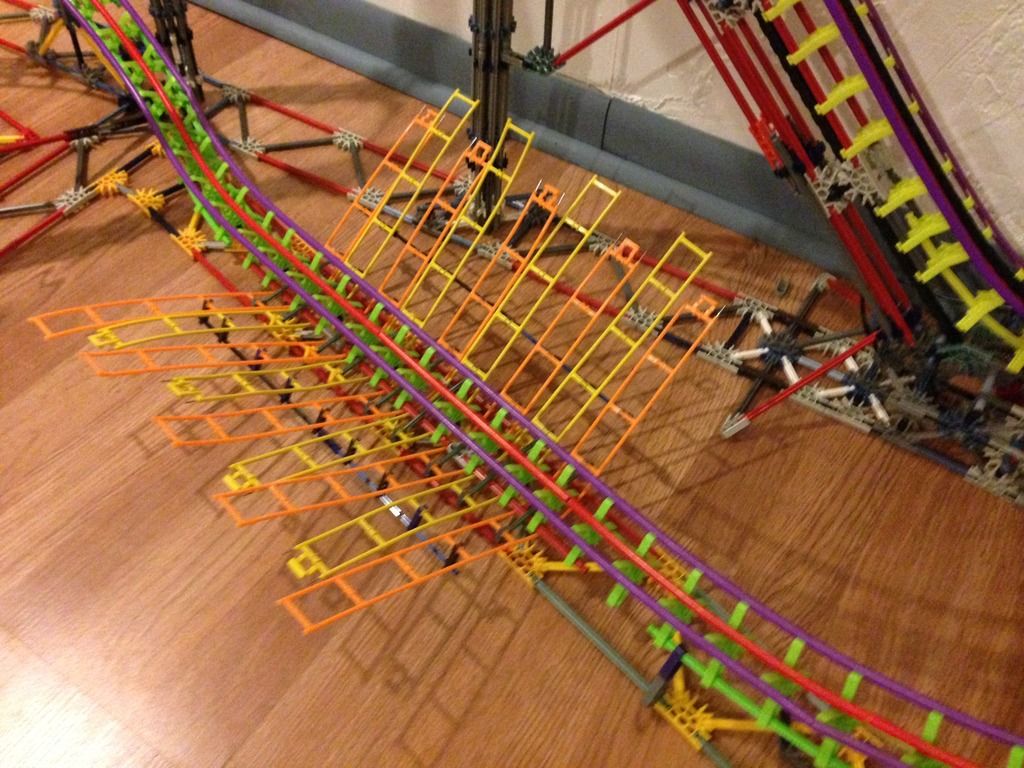
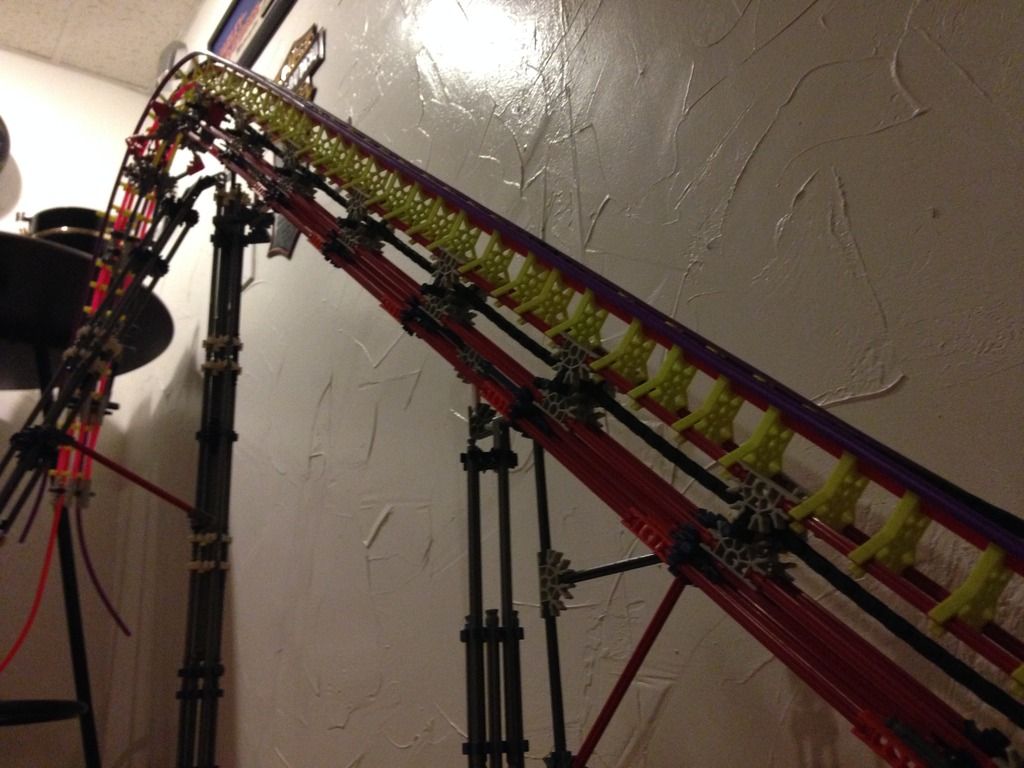
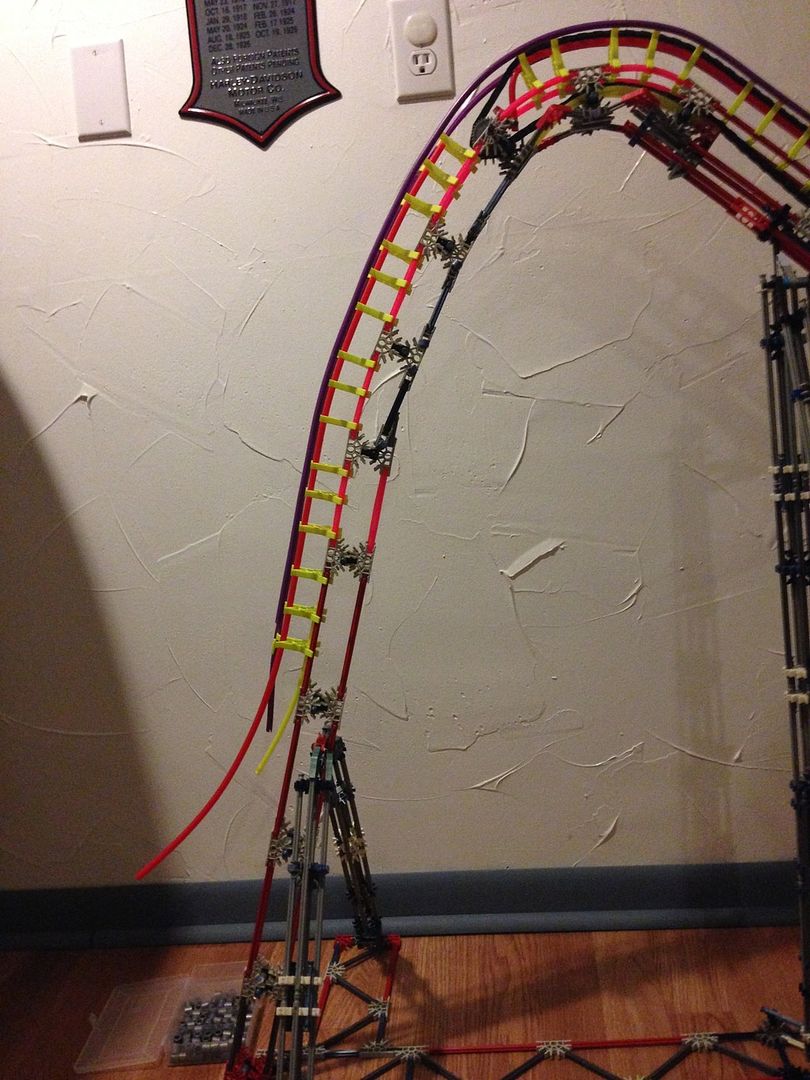
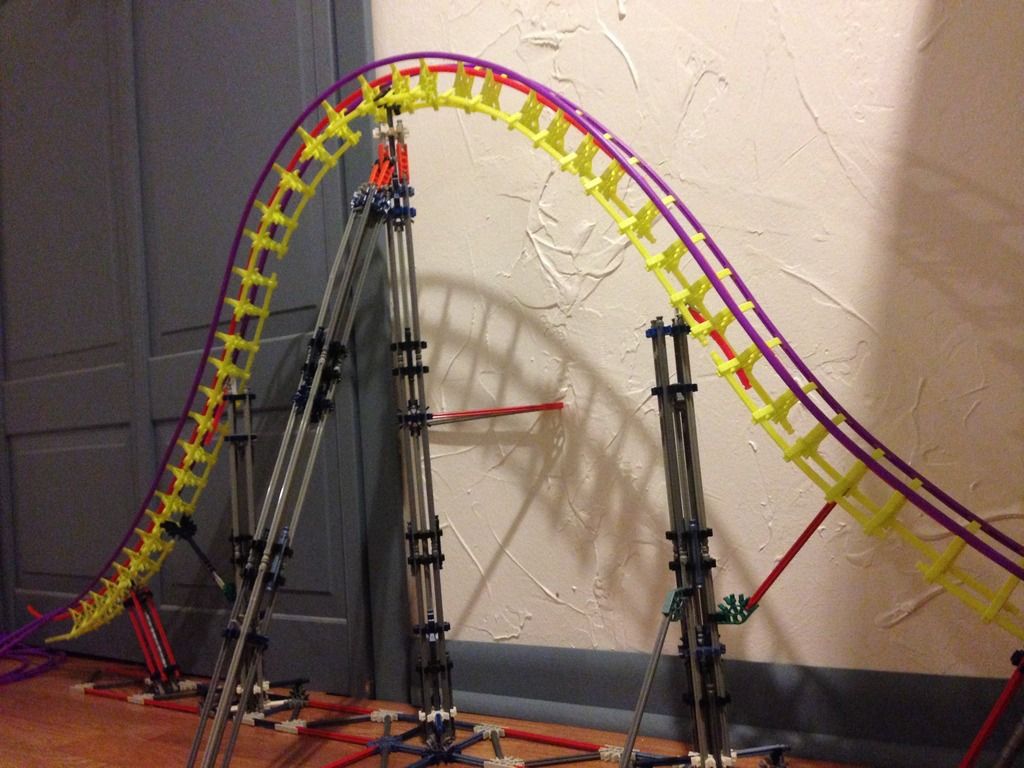
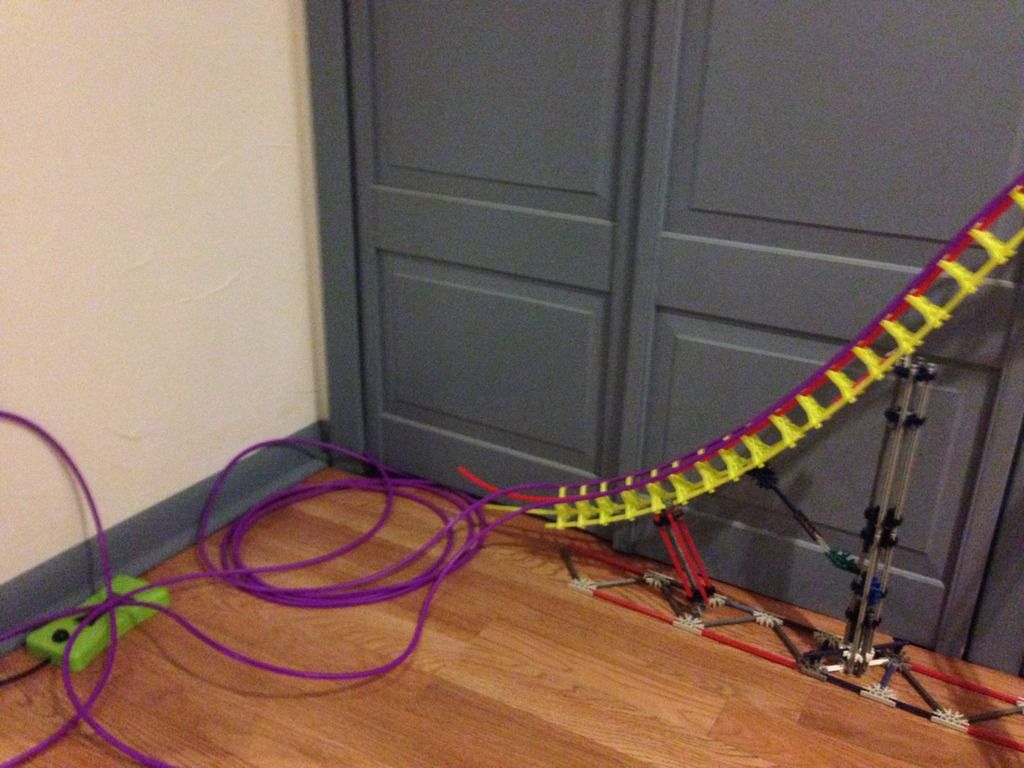
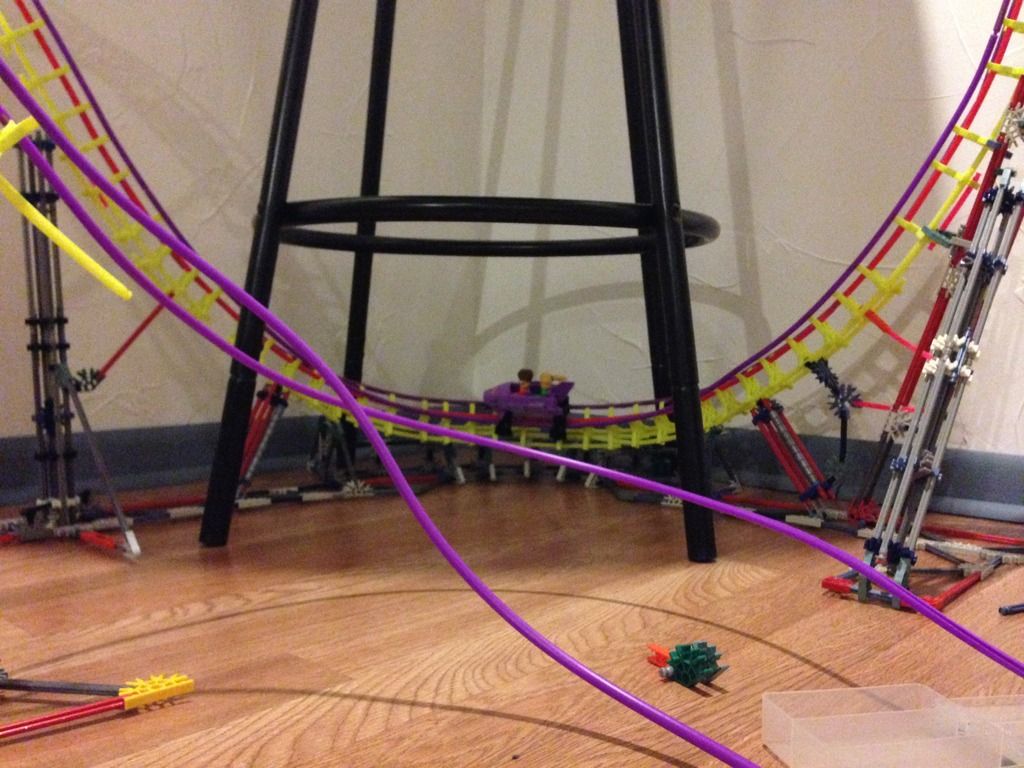
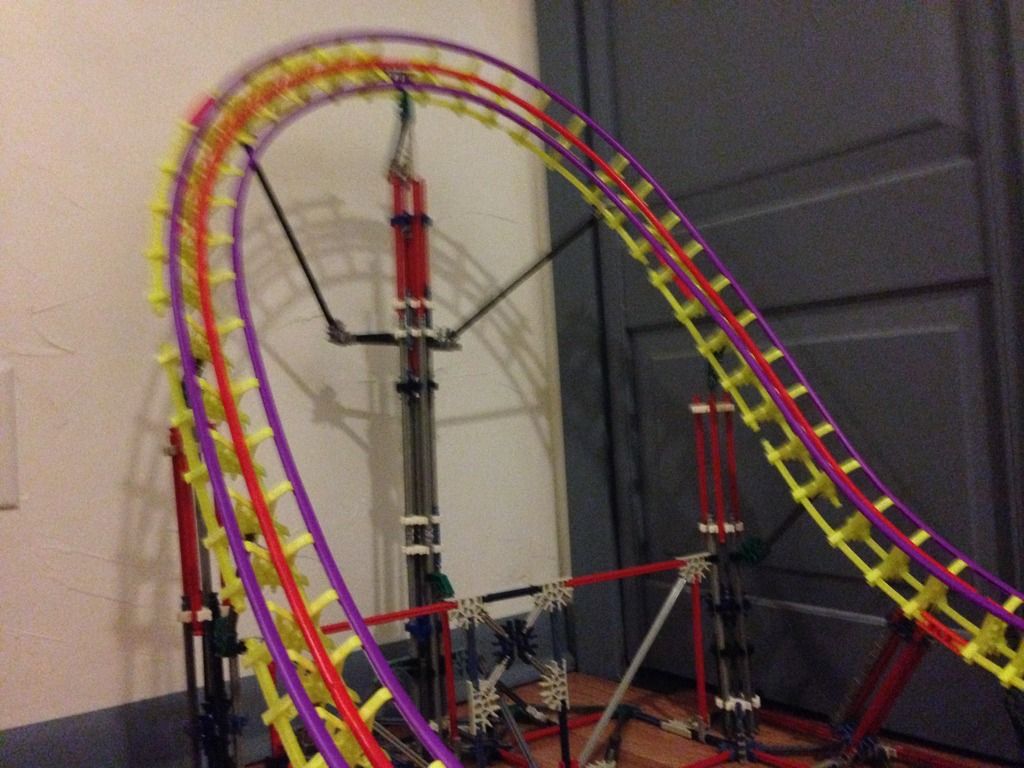
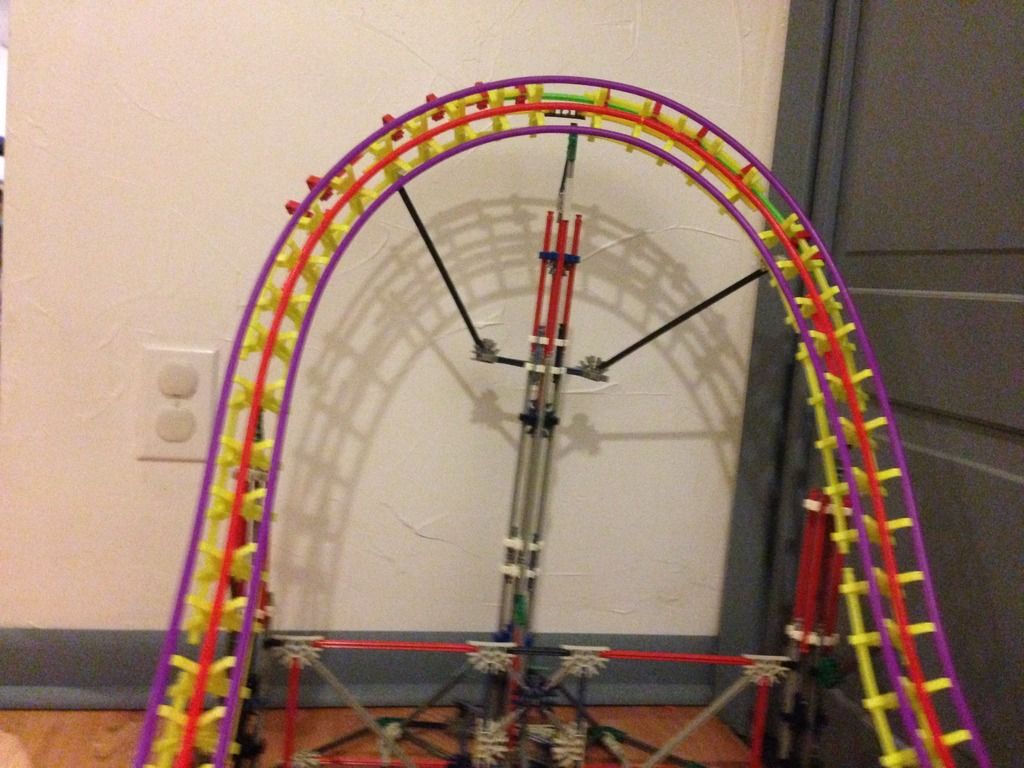
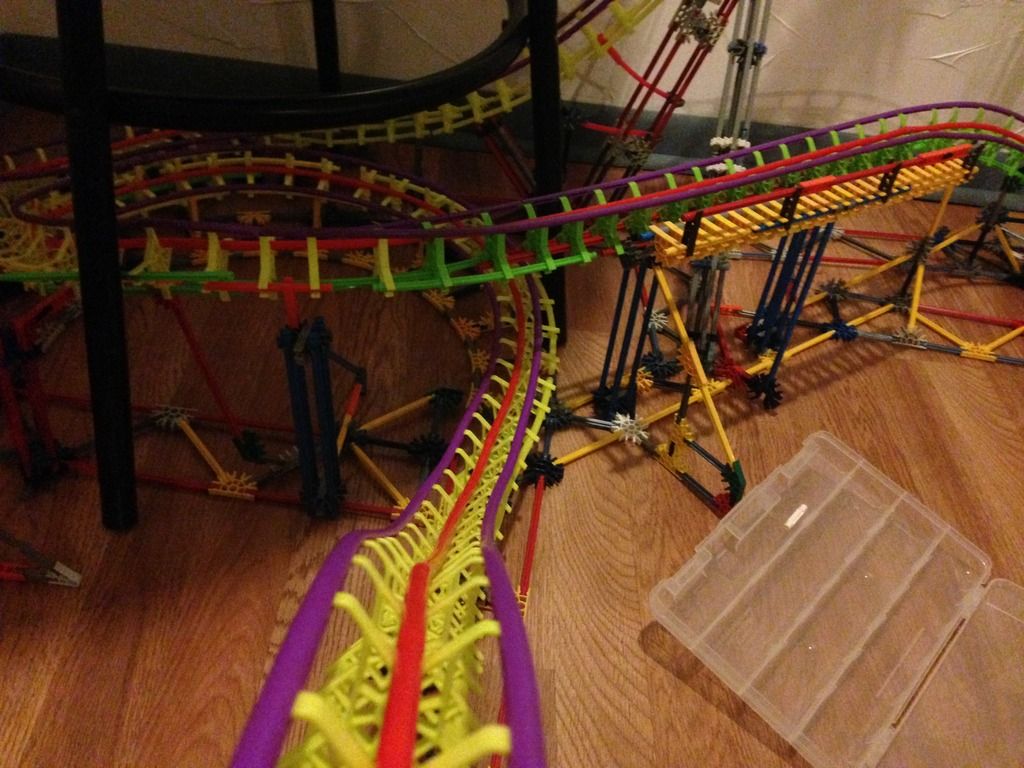
Next, of course, comes the important process of shaping the drop correctly. I'm kind of going for a Nitro / Diamondback / Intimidator type of look. I tried to get it as best as I could from my perspective, but I definitely need the feedback of you guys: How does the shaping looking?


IMG_0360_zpsnsu0bgha.jpg


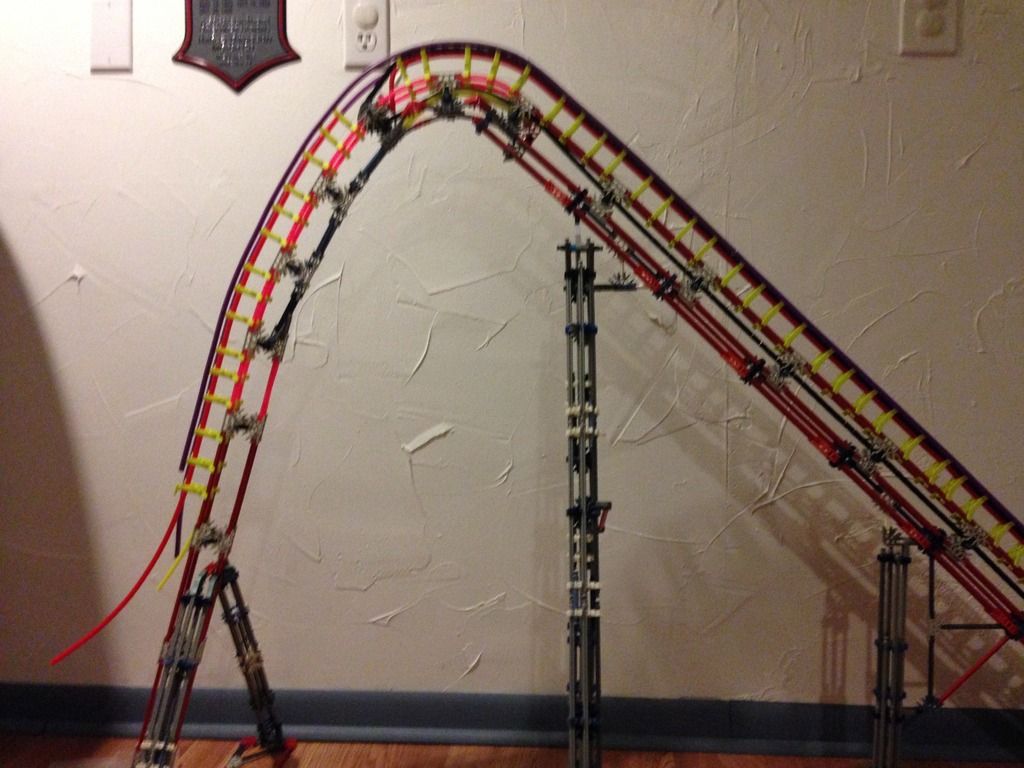
Here's a little less blurry image so you can better judge the overall shaping.  :P


IMG_0361_zpsnskks3t8.jpg


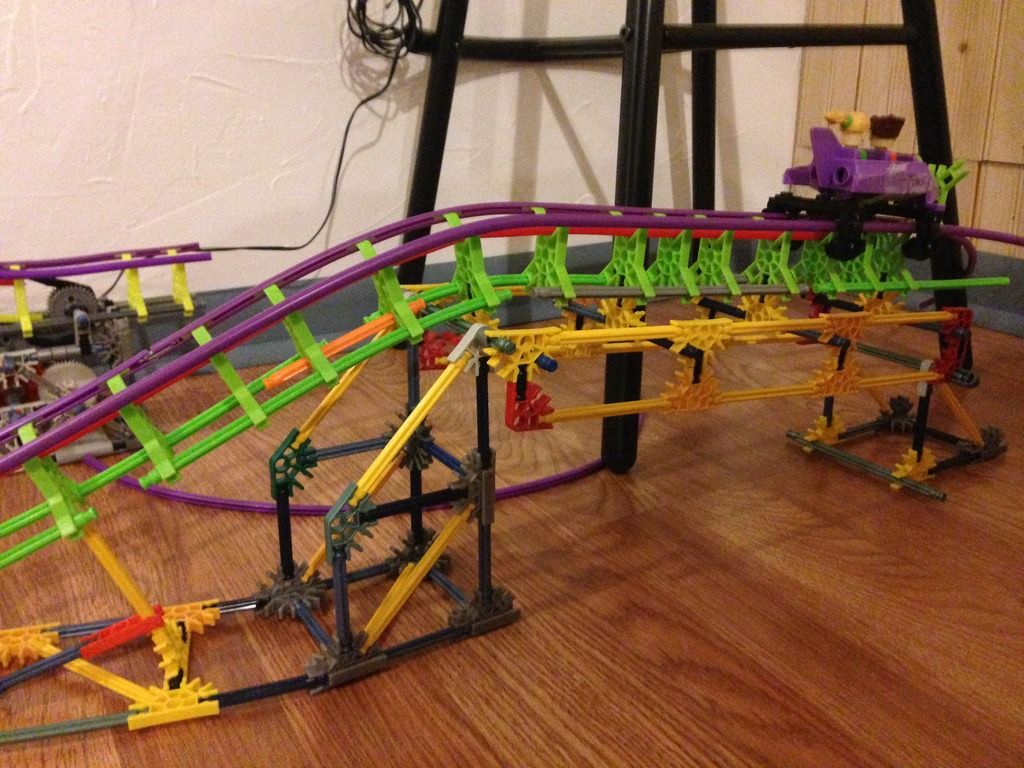
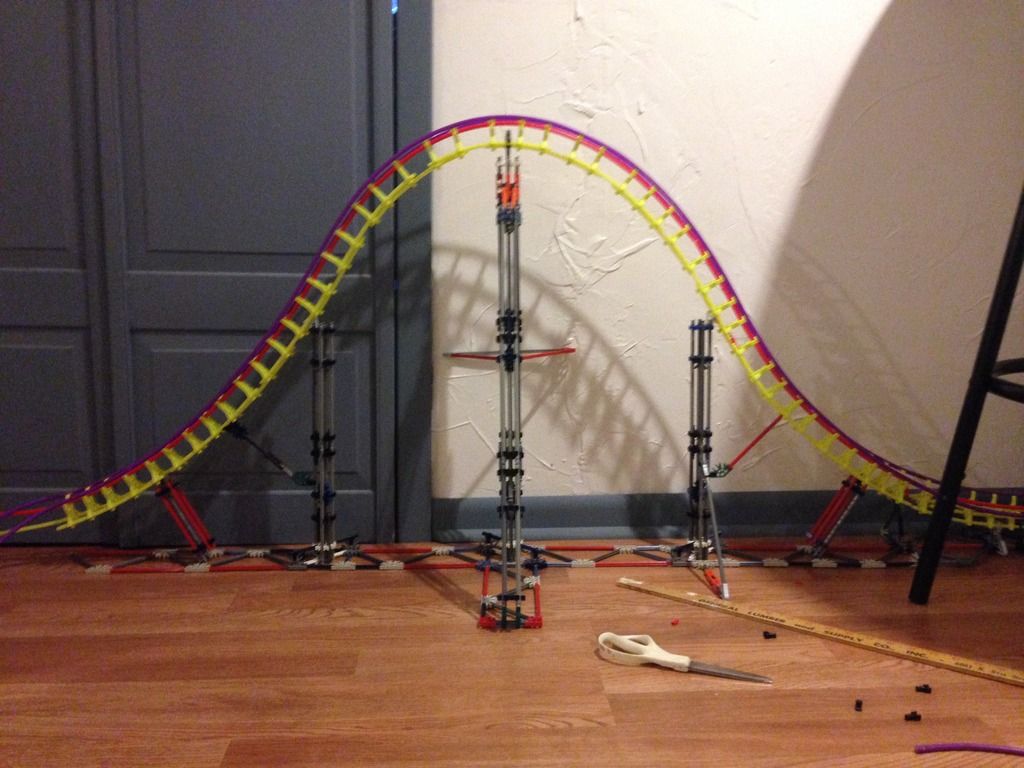
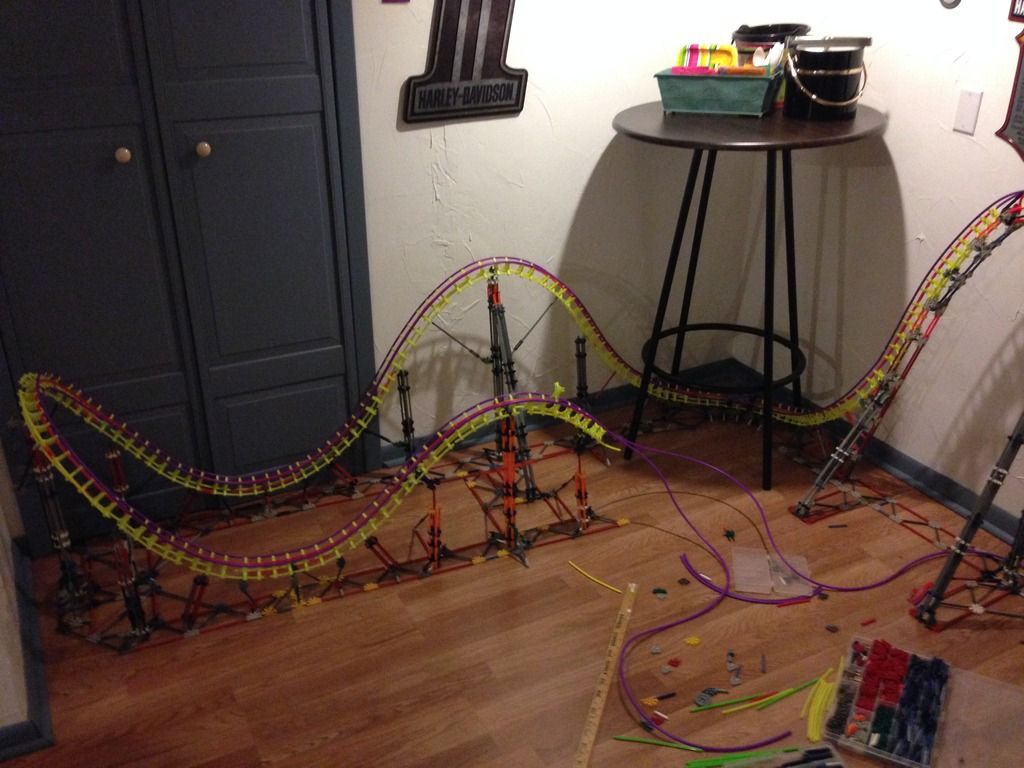
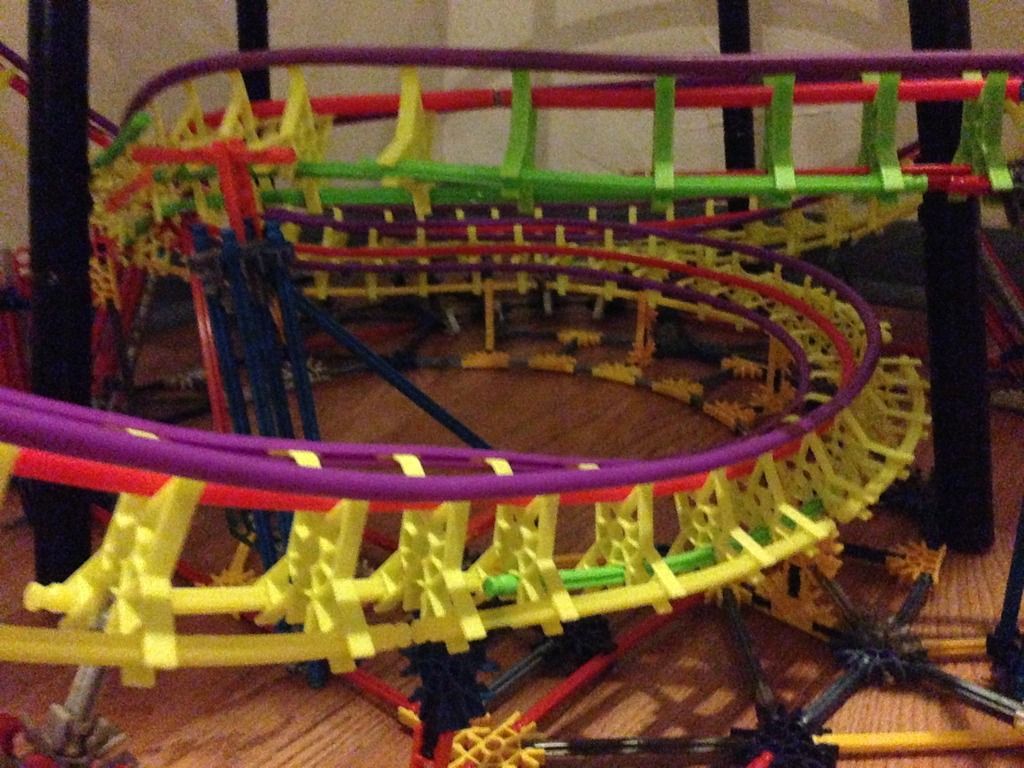
Overall all construction has gone surprisingly smoothly. After about a 3-3.5 foot lift hill, I should have plenty of energy to continue on with a full blown classic B&M out-and-back layout. And now that I know how to lube my cars CORRECTLY, that will help as well.  (H)


Just in case I didn't cover anything, below is a YouTube Update link that showcases this update in action (I forgot how to imbed YouTube videos on here; the new SSC is different so if you guys could help me out with this too that'd be great! :) )


https://www.youtube....h?v=rf1dqz56RLY


Please give me all the feedback you can! I will try my best to utilize this feedback before I continue on with the layout!


Thanks,

KKid99  (H)


"Less pieces = more fun . . ." (H)

- KKid99

#2 Spaghetti

Spaghetti

    Golden State blew a 3-1 lead in the 2016 NBA Finals.

  • 786 posts

Posted 05 November 2015 - 01:20 PM

Looks great! The only thing that bugs me is the drop because there are 2 straight spots. Also, do you have any SS cars? I'm just wondering.

banner_georgia_scorcher3_sfog_0.jpg?itok


#3 maarten12

maarten12

    Medium-Gump

  • 2917 posts

Posted 05 November 2015 - 02:01 PM

Looks great! The only thing that bugs me is the drop because there are 2 straight spots. Also, do you have any SS cars? I'm just wondering.

I guess so, because there's some purple tubing :).


You might want to place some gears for the chain to run through at the pull in and crest, that way it'll probably run smoother (I don't know if you tested that yet though). Also, is that one single motor going to be able to lift your train? Apart from that it's looking quite good. 


Posted Image


#4 FrIeDeGgS

FrIeDeGgS

    Eurofighter Enthusiast

  • 805 posts

Posted 05 November 2015 - 03:43 PM

Yah there's a bump about halfway through what you have of the drop so far. I like the accuracy to what B&M hypers look like though!


39751.png

Sad that I no longer have 69 internets


Current Project: Un-named Eurofighter


#5 KKid99

KKid99

    Ejector Airtime Lover

  • PipPipPip
  • 38 posts

Posted 05 November 2015 - 06:56 PM

I guess so, because there's some purple tubing :).


You might want to place some gears for the chain to run through at the pull in and crest, that way it'll probably run smoother (I don't know if you tested that yet though). Also, is that one single motor going to be able to lift your train? Apart from that it's looking quite good. 


I do not own a Screamin' Serpent car. I only ever owned a full Rippin' Rocket set; the rest is all extra pieces that I've purchased over the years. Although now that I know that I know that SS cars work just fine with micro chain links, I am probably going to purchase the SS train in the coming weeks. And what do you mean by placing the gears? Maybe it's just the wording but it doesn't make any sense to me. Or if anyone else could clarify what he means by this?


Yah there's a bump about halfway through what you have of the drop so far. I like the accuracy to what B&M hypers look like though!


I will try to wrinkle that out, although I may have to alter the lift structure a bit to allow for this. The cross ties are directly connected to the primary spine support.


"Less pieces = more fun . . ." (H)

- KKid99

#6 Rollerfreak987

Rollerfreak987

    definitely gone crazy

  • 2448 posts

Posted 05 November 2015 - 07:34 PM

What Maarten means about the gears: If you have gears where the chain goes onto the track at the pull-in and the crest, then your lift will be a lot smoother, and function a lot better. 


The gears you have now are positioned awkwardly making weird transitions for the chain. If you move your top gear up a bit as well as the gear at the pullin it will be much better. Your lift will still work the way it is, and it's up to you if you want to change it, but it will *in theory* work better if you take his suggestion :P.


1- Time Traveler 2- Magnum XL-200 3- The Voyage 4- Velocicoaster 5-Iron Gwazi 6- Phantom's Revenge 7- The Beast 8- The Legend 9- Tiested Timbers 10- Steel Vengeance 

Follow me on Instagram @coastergeek987
Credit Count: 305


#7 KKid99

KKid99

    Ejector Airtime Lover

  • PipPipPip
  • 38 posts

Posted 06 November 2015 - 10:47 AM

What Maarten means about the gears: If you have gears where the chain goes onto the track at the pull-in and the crest, then your lift will be a lot smoother, and function a lot better. 


The gears you have now are positioned awkwardly making weird transitions for the chain. If you move your top gear up a bit as well as the gear at the pullin it will be much better. Your lift will still work the way it is, and it's up to you if you want to change it, but it will *in theory* work better if you take his suggestion :P.


Oh I get it. It just took me awhile to figure out what you guys meant by "pull-in" haha. I'll try to fix that in my next update. Thanks! 


"Less pieces = more fun . . ." (H)

- KKid99

#8 KKid99

KKid99

    Ejector Airtime Lover

  • PipPipPip
  • 38 posts

Posted 12 November 2015 - 06:32 PM

Here's another update. I have made some significant progress and improvements since last time. Sadly, not all things worked according to plan, but more on that later. 


So, let's start things off with some improvements that I made via your critiques and feedback.


The lift hill has been re-shaped. There are no more straight sections.


IMG_0363_zps7tnqpemf.jpg


This was made possible by a minor tweak in the underbelly support structure.


IMG_0364_zpsmzj402aa.jpg


The first turn turned out very well, and includes some pretty sick heartlining. Sadly, this perfection has to be redone; but, more on that later... :P


IMG_0365_zps8i9wjpjt.jpg


IMG_0366_zpsglvnlz68.jpg


Next is the first element after the drop, a standard B&M Hyper Airtime hill. It includes three primary supports, with one "helper" support that helps reduce shaking. It might not look like it, but it is very strong and not all that shaky. There aren't many laterals to cause it to shake.


IMG_0367_zpshh3rymfg.jpg


The shaping still needs to be tweaked a little. I think I might need extra supporting element(s).


IMG_0368_zpseg1mszx0.jpg


Here's an overview of the layout thus far. It looks amazing and is easily the best-looking roller coaster I've produced so far.


IMG_0369_zpsm68xspom.jpg


Now here's where the trouble comes... :(


IMG_0370_zpspr1mkp0s.jpg


As you can see, I do not have much room at all for a hammerhead turnaround, which was my initial intention. I will need to shorten the first turn out of the drop in order to allow more room for the airtime hill and the turnaround. Sadly, that means redoing the pretty amazing turn, and I have already begun to reshape it. As long as I redo the first turn correctly, I should have enough room to fit the turnaround in the corner. 


I also made a few changes to the lift mechanism, but as I'm typing this I forgot to take a couple pics of it. I guess that will go in the next update then! B)


Please give me feedback on how this looks and feels!


And also stay tuned -- I'll have another update as soon as I complete the hammerhead.


Thanks,

KKid99


"Less pieces = more fun . . ." (H)

- KKid99

#9 IOAgeek

IOAgeek

    Excited for Iron Gwazi!

  • 1152 posts

Posted 22 November 2015 - 12:49 AM

The crest on the lift bugs me but the shapping of the hill is good for now, can you possible move the cosater in another direction to put the turnaround in. Also, how do you have the purple SS tubing but you're using a RR car, doesnt make much sense lol.


#10 KKid99

KKid99

    Ejector Airtime Lover

  • PipPipPip
  • 38 posts

Posted 22 November 2015 - 03:19 PM

The crest on the lift bugs me but the shapping of the hill is good for now, can you possible move the cosater in another direction to put the turnaround in. Also, how do you have the purple SS tubing but you're using a RR car, doesnt make much sense lol.

Yeah I already altered the first turn so that I would have enough room for the turnaround. As far as the RR car question, I am looking at purchasing an SS train very soon. I got the purple tubing as replacement tubing awhile back, so that explains why I have purple tubing but only an RR car.


"Less pieces = more fun . . ." (H)

- KKid99

#11 CartRacer56

CartRacer56

    Inversion Enthusiast

  • 1031 posts

Posted 23 November 2015 - 07:41 PM

On the turn, It should never be flat to the ground. It should be more like a pull out that you turned and gave some banking. Do you know what I mean? I disagree with what IOAgeek about the crest I think it looks fantastic. 


#12 WSWAoasters

WSWAoasters

    Newbie

  • 198 posts

Posted 24 November 2015 - 12:43 AM

I agree with IOAgeek, I think the crest looks a bit odd; however, I think it's not really a big deal if you leave it. I really like what I can see! I also really like your building style. I like how unique, pristine, and professional it looks. It just looks so awesome! Excellent job! (thumbsup)


#13 Kevkillerke

Kevkillerke

    Mr. circus

  • 1658 posts

Posted 24 November 2015 - 02:53 AM

Maybe you can keep the hill, but don't let it go to the ground again.

So the drop of that hill can end in the middle, then you should have enough place (and it looks cool I guess)


Posted Image
Click > Spirit Bomb/Blue Fire!/Double O/Kirnu < Click
SSC award 2014: Best SlimTrack Coaster
Eruption
Posted Image


#14 KKid99

KKid99

    Ejector Airtime Lover

  • PipPipPip
  • 38 posts

Posted 24 November 2015 - 11:13 AM

On the turn, It should never be flat to the ground. It should be more like a pull out that you turned and gave some banking. Do you know what I mean? I disagree with what IOAgeek about the crest I think it looks fantastic. 

I actually redid the first turn a week ago and it fits the criteria of never being flat to the ground. I got what you meant.


I agree with IOAgeek, I think the crest looks a bit odd; however, I think it's not really a big deal if you leave it. I really like what I can see! I also really like your building style. I like how unique, pristine, and professional it looks. It just looks so awesome! Excellent job! (thumbsup)

Thank you! I really tried to make it clean-cut and minimalistic! Hopefully I won't have to sacrifice rigidity for looks.


Maybe you can keep the hill, but don't let it go to the ground again.

So the drop of that hill can end in the middle, then you should have enough place (and it looks cool I guess)

Yeah I redid the first turn after the drop and everything seems to be fitting in place; I can even have the track go all the way to the ground after the hill (which is what I wanted). I just finished the hammerhead turnaround; now I'm working on the shaping and structural rigidity.


Thank you guys so much for the feedback! It has been so helpful.  :D


As I mentioned earlier in this post I am almost done finalizing the hammerhead turnaround. As soon as I complete it, I will have in-store another picture update and perhaps another YouTube update!


Thanks again you guys!


"Less pieces = more fun . . ." (H)

- KKid99

#15 KKid99

KKid99

    Ejector Airtime Lover

  • PipPipPip
  • 38 posts

Posted 01 December 2015 - 06:55 PM

Hey you guys! 


It's been about two weeks since my last construction picture update, and I have made plenty of progress! I got a lot of building done over Thanksgiving break and thankfully (lol) 
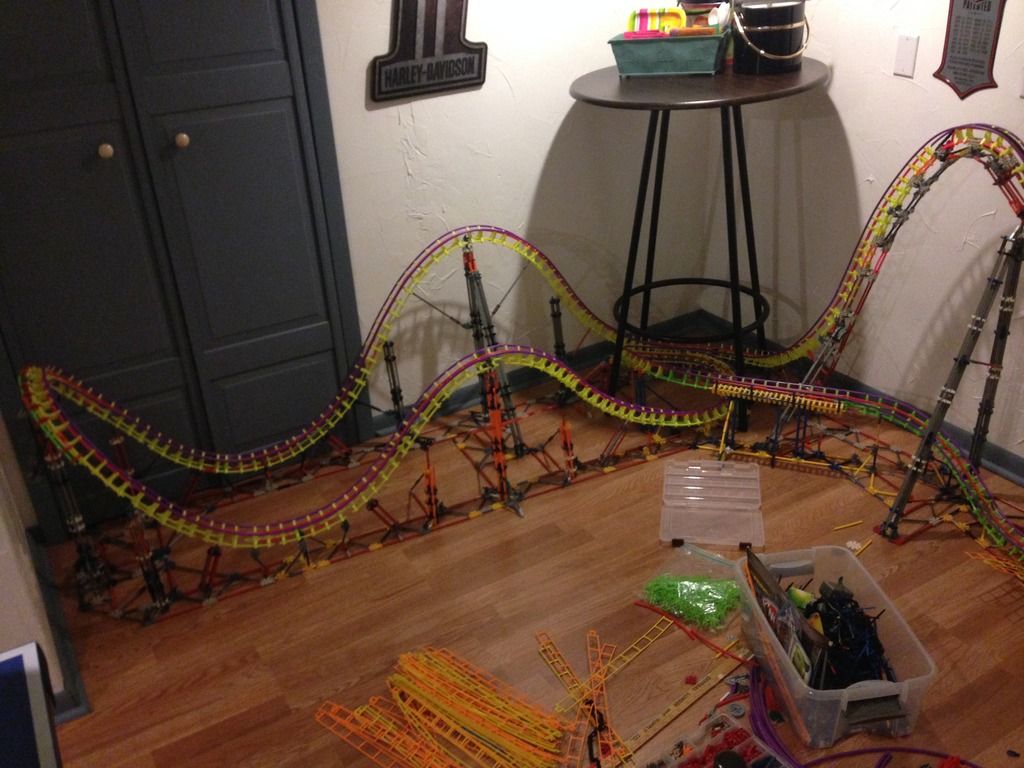
everything is going according to plan. So, lets stop wasting time and get right into it!  :lol:


First things first I redid the entire first turn and pullout. This way, I could successfully fit in the hammerhead with the amount of space that I had. As you can see, I took Cartracer's advice and made it is that the pull-out is not flat to the ground to ensure the least speed loss possible.


IMG_0411_zpsh4aj6ukh.jpg


Here's another view of that redone turn. It still has the amount of heartlining necessary (Hopefully[?]).


IMG_0410_zpsjko1g5on.jpg


I made a few changes to the first airtime hill as well. Now it has better shaping and structural integrity. I added two 'helper' supports on either half of the hill.


IMG_0396_zpsmgta0ofe.jpg


Now, onto what I've added. First, the hammerhead. The supporting and footings system allows it to be very strong. Sorry the below picture is blurry haha.  :P


IMG_0402_zps9c3sl08n.jpg


Here is a little less blurry picture of the hammerhead. It is very apparent that I still need to stabilize it just a little bit more to make sure that it is shaped correctly.


IMG_0403_zps0ehwgvak.jpg


A top-down view of the hammerhead:


IMG_0405_zpscvyvr8og.jpg


And now onto the next element: another airtime hill, this time one that's just a little smaller. Sorry for the sudden color change in tubular supports, I ran out of the long gray rods so I had to improvise. However, with a name like "HellFire" orange shouldn't be such an issue.  :P


IMG_0406_zps5z0dvqfq.jpg


Here's a final look at the layout I have completed so far. It is looking very nice; I just need to fix a few shaping issues before I can move onto the remaining portion of the layout. 


IMG_0407_zpsrvd3rvyz.jpg


This picture below really puts this into perspective. It is really looking like an authentic B&M Hyper coaster, which is amazing. 


IMG_0408_zpskg3mga1k.jpg


Just in case I'm a terrible explainer, here's a link to a video update on my YouTube channel that gives you this information and a test run of the thing!


https://www.youtube....h?v=ZxwJ13I08Ig


BTW -- does anyone know how to embed YouTube videos straight into posts. On the revitalized website the video option is gone it appears. Could somebody help me out?


Please comment with your feedback! I look forward to giving you more updates in the future as I finish up the layout. 


Thanks,

KKid99  (H)


"Less pieces = more fun . . ." (H)

- KKid99

#16 KKid99

KKid99

    Ejector Airtime Lover

  • PipPipPip
  • 38 posts

Posted 07 December 2015 - 08:41 PM

Hello everyone! After what has seemed like an instant, I have officially completed the layout of this B&M Hyper Coaster up until the final brake run. It is fully-functional, which you will see in this update.


This update is a dewsey, so keep your socks on!  ^_^


Anyways onto the pictures:


Some alterations that I made to the existing layout that I had before involved some structural improvements. The structural element along the top of the hammerhead allowed it to be more rigid and maintain its shaping much better:


IMG_0438_zpscx6rbxp3.jpg


I also increased the height of the second airtime hill just a tad just to make sure I had enough energy to get through the rest of the layout. Turns out my estimations were correct!  :D


IMG_0436_zpsgovlqpd5.jpg


Now onto everything new that I've added! I decided to go with a helix into the mid-course brake run. The brake run ended up being a little bit too small for my liking only because of the black bar from the table (visible in this picture). Sadly I ran out of orange rods so I had to use blue rods for the tube supports, which kind of ruins the theming but whatever haha.  :P You can also see that I put a single catwalk with handrail on the MCBR.


IMG_0431_zpss06ozyt1.jpg


Here is another view of the helix. It turned out well I believe.


IMG_0430_zpsgxlpwg9f.jpg


Here is the exit of the MCBR and the entrance into the splashdown. It is in obvious need of tweaking heartlining and shaping wise.


IMG_0432_zpsgdrqkvod.jpg


Instead of a normal 'typical' splashdown, I wanted to add some thematic flare, so I decided to substitute the water for 'fire!' I call this signature element the "Crashdown," since it is themed to a WWI era dogfight. (See what I did there?!??  ;) ) The 'flames' are some of my micro track that I have.


IMG_0433_zpsw6mlifxa.jpg


Here's an overhead view of the "Crashdown:"


IMG_0434_zpswixo3ara.jpg


Next we have the infamous final brake run. This brake run, however will not be home to working brakes, however. I will just let the ride use its energy to fly through the station and connect back to the base of the lifthill. Double-sided catwalks will be added soon... That'll be coming in the next update with all of the other finishing touches!  :lol:


IMG_0435_zpsqpmdblw0.jpg


Here's an almost complete overview of the layout. It's easily my longest coaster in duration that I've ever made, and perhaps my longest as well! It really has that classic B&M charm to it. Things could be improved, however. (Perhaps with some theming?!?)


IMG_0439_zpspaphlm0d.jpg


Regardless it's looking beautiful...


IMG_0440_zpscydgyq8y.jpg


And here's another video update from my YouTube channel. AGAIN, can somebody please teach me how to embed YouTube videos right into the post??!??? Please and thank you.


https://www.youtube....h?v=-cGgZBeznso


I also need feedback on what I can do to clean things up and / or shape things better! Please be critical! I need this to be my best coaster yet!


Also give your ideas for further themed elements! I could always use those as well.


Stay tuned for another update on finishing touches such as the station and other scenery pieces / thematic elements!


Thanks,

KKid99


"Less pieces = more fun . . ." (H)

- KKid99

#17 Rollerfreak987

Rollerfreak987

    definitely gone crazy

  • 2448 posts

Posted 07 December 2015 - 10:29 PM

Really cool coaster! Definitely one of my favorites from you. Although you really need to get an SS train, it makes all the difference.

As far as embedding youtube videos you just use the you tube tags [youtube]v=?randomstuff[/youtube*] but without the star. You may have to play around with the stuff in the middle of the two tags, but its something along the lines of what I wrote.

Looking forward to your next coaster :)

1- Time Traveler 2- Magnum XL-200 3- The Voyage 4- Velocicoaster 5-Iron Gwazi 6- Phantom's Revenge 7- The Beast 8- The Legend 9- Tiested Timbers 10- Steel Vengeance 

Follow me on Instagram @coastergeek987
Credit Count: 305


#18 WSWAoasters

WSWAoasters

    Newbie

  • 198 posts

Posted 08 December 2015 - 11:25 PM

This coaster is wonderful! However, although I feel like the SS cars look really cool, I feel like the RR cars are partially what keep your builds so different. (In a good way, of course). Again, this coaster is so great! I can resist to see the finished product! Great job! (thumbsup)


Also tagged with one or more of these keywords: b&m, hyper, construction